Configuring Zones in CMP
After a zone has been created in CloudStack, it must be configured manually in StackConsole CMP before customers can provision resources in that datacenter region.
This page explains how to add and update zones in CMP, map them to CloudStack zones, and understand the purpose of each field on the Add Zone form.
Ensure the following before configuring a zone in CMP:
- The zone exists and is operational in CloudStack
- The Cloud Provider Setup for this CloudStack instance is already configured in CMP — see Connecting CMP to CloudStack
- You know the CloudStack zone name you want to map (visible in the CloudStack UI under Infrastructure → Zones)
Zone configuration is manual
Zone inventory in CMP is not updated automatically when CloudStack changes. CMP does not provide a self-service Sync option for zones.
Any zone created, renamed, or removed in CloudStack must be configured or updated manually in CMP under Settings → Orchestrator → Zones.
Changes made directly in CloudStack are not automatically reflected in CMP. After creating or modifying zones in CloudStack, an administrator must update the corresponding zone mapping in CMP.
Initial setup (Wizard Step 3)
During first-time Cloud Provider setup, add zones in Wizard Step 3 — Zone. See Connecting CMP to CloudStack.
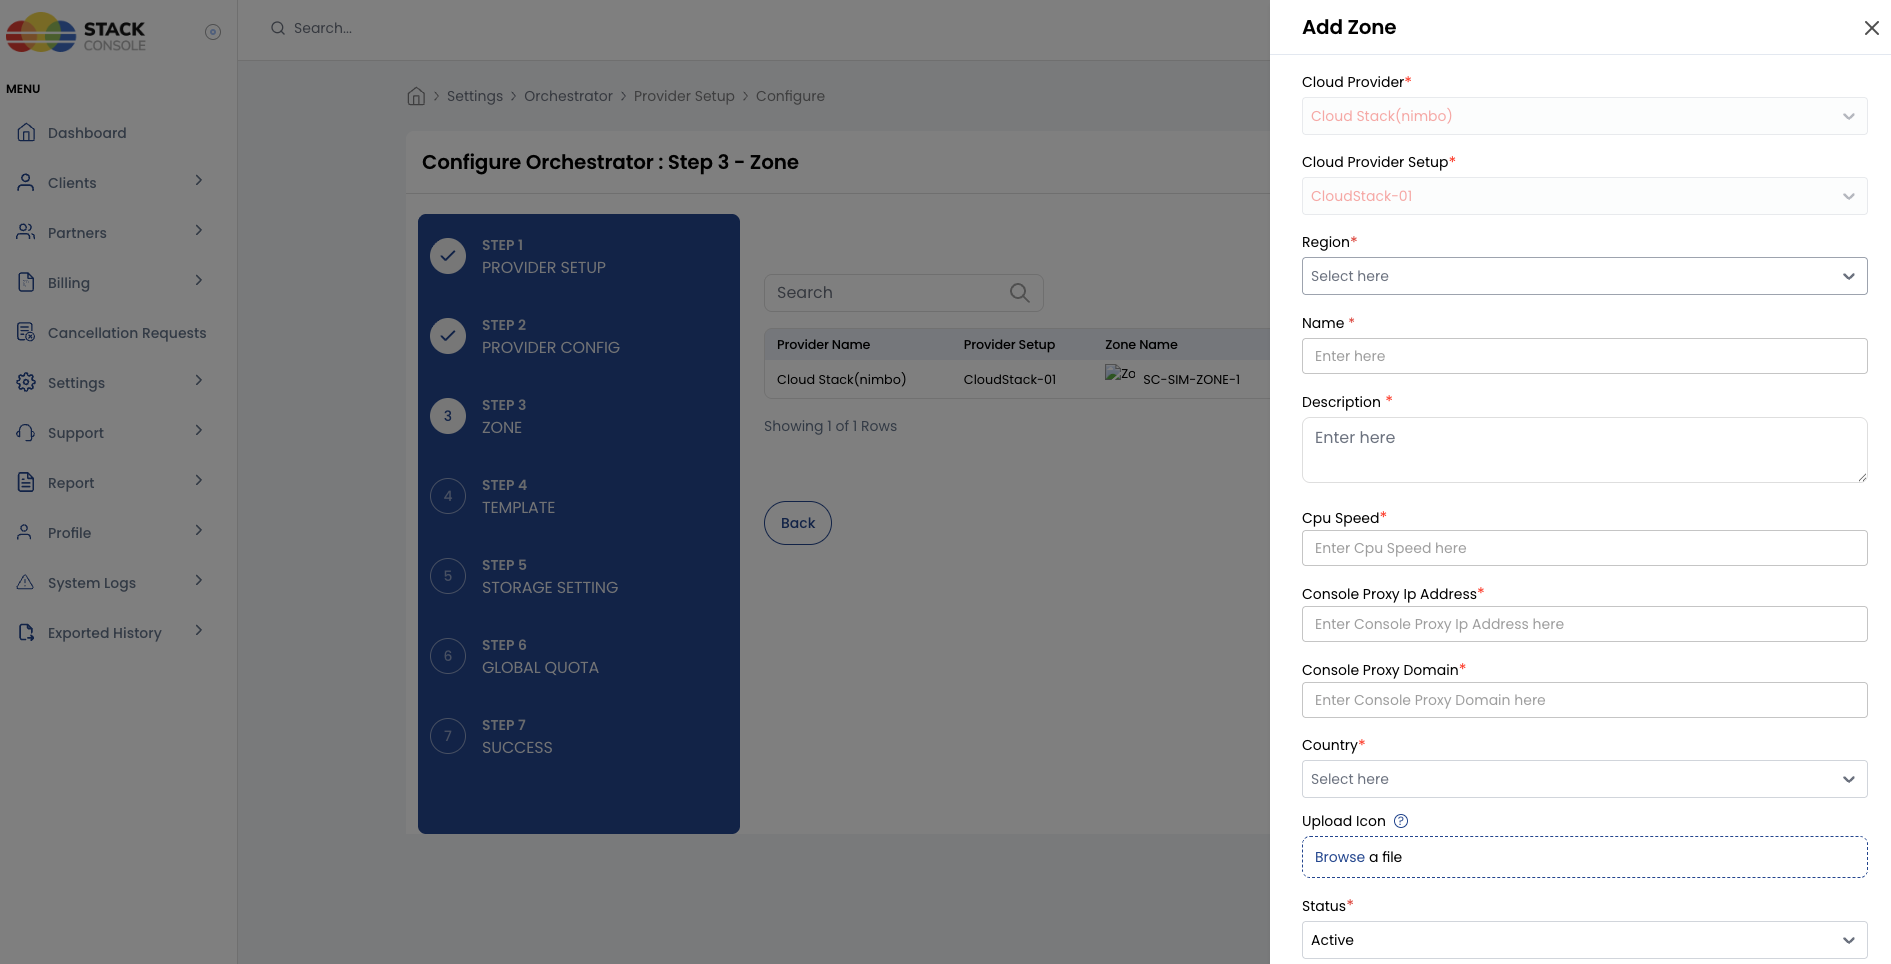
Creating or editing a zone
- Log in to the CMP Admin Panel
- Navigate to Settings → Orchestrator → Zones
- Click Add Zone (or open an existing zone to edit)
- Configure the fields described below
- Set Status to Active and click Save
Configure the fields below in the order they appear on the form. Fields marked Required must be completed before saving an active zone.
Cloud Provider
Required. Select the orchestrator type this zone belongs to — for example, CloudStack (Nimbo).
This field determines which orchestrator API CMP uses when provisioning resources in this zone. For CloudStack integrations, select your CloudStack cloud provider entry.
Cloud Provider Setup
Required for active zones. Select the Cloud Provider Setup instance that connects CMP to your CloudStack environment — for example, CloudStack-01.
Each zone must be linked to exactly one Cloud Provider Setup. The Region dropdown is populated from zones available on that setup's CloudStack API connection.
When Is Coming Soon is enabled, Cloud Provider Setup and Region mapping are not required. See Is Coming Soon.
Region
Required for active zones. Select the CloudStack zone to map to this CMP zone entry.
The Region dropdown lists zones returned from the selected Cloud Provider Setup. Choose the CloudStack zone where customer VMs and related resources should be provisioned.
| Requirement | Detail |
|---|---|
| CloudStack zone must exist | Create and enable the zone in CloudStack before mapping it in CMP |
| One CMP zone per CloudStack zone | Each CloudStack zone used for customer provisioning needs its own CMP zone entry |
| Correct setup selected | The region list reflects only zones on the selected Cloud Provider Setup |
If Region does not match the intended CloudStack zone, provisioning fails or resources are created in the wrong datacenter. Verify the CloudStack zone name in Infrastructure → Zones before saving.
Name
Required. Enter the display name for this zone — for example, Mumbai DC 1 or EU-West Frankfurt.
Name is shown to customers in the CMP portal when they select a datacenter region. Use a clear, customer-friendly label. This field is independent of the CloudStack internal zone name; orchestrator mapping is handled by Region.
Description
Required. This is admin representation only, it is not diaplayed anywhere for customers.
Country
Required. Select the geographic country for this zone.
Country is used for display and filtering in the customer portal — for example, grouping zones by country or showing a flag alongside the zone name.
Upload Icon
Optional. Upload an icon image for this zone using Browse a file.
If uploaded, the custom icon is shown to customers when they select a zone during resource creation — for example, when provisioning a VM and choosing a datacenter region. If no icon is uploaded, CMP uses the country flag for the selected Country as the default icon.
Use a square or near-square image for best results.
Status
Required. Controls whether the zone is available to customers for provisioning.
| Status | Behavior |
|---|---|
| Active | Zone is enabled in CMP — customers can see it (subject to Is Coming Soon) |
| Inactive | Zone is hidden from customer provisioning workflows — customers cannot select or provision in this zone |
Set Status to Active when the zone and all dependent configuration are complete.
Use Inactive while you finish setup — for example, when you are already in production and adding a new zone. Create the zone entry in CMP, map Region, then leave Status as Inactive until templates, Marketplace apps, packages, quotas, and other zone-scoped settings are configured. Switch to Active only when the zone is ready for customer use.
Inactive zones remain visible in the CMP admin panel so administrators can configure templates, packages, and other dependent components before go-live. Inactive only hides the zone from customer-facing provisioning — not from admin configuration workflows.
Is Coming Soon
Optional. Enable to show a zone to customers before it is operationally ready for provisioning.
| Behaviour | Detail |
|---|---|
| Visible to end users | Yes — customers can see the zone listed |
| Available for provisioning | No — the zone is disabled for VM and resource creation |
| Cloud Provider Setup required | No — backend mapping can be deferred |
| Region mapping required | No — Region can remain unset until the zone is ready |
Use this for pre-launch announcements, planned datacenter expansions, or marketing visibility before CloudStack backend readiness — for example, announcing an upcoming datacenter region or showing a planned expansion location before backend mapping is complete.
When the zone is ready:
- Edit the zone in Settings → Orchestrator → Zones
- Uncheck Is Coming Soon
- Complete Cloud Provider Setup and Region mapping
- Set Status to Active and save
After saving
Once a zone is active and mapped:
- Configure Templates for this zone
- Assign VM packages scoped to this zone
- Configure quotas per Provider + Zone combination
Packages, templates, and quotas are scoped per Cloud Provider + Zone — each new zone requires its own package and template configuration even when CloudStack shares offerings across zones.
Validation checklist
Before making a zone available to customers, verify:
- The zone exists and is enabled in CloudStack
- Cloud Provider and Cloud Provider Setup point to the correct CloudStack instance
- Region maps to the intended CloudStack zone
- Name, Description, and Country are set with customer-facing values
- Is Coming Soon is disabled for production zones
- Status is set to Active
- Templates and packages are configured for this zone