Configuring Templates in CMP
After a template has been created and validated at the orchestrator level, it must be re-configured manually in StackConsole CMP before it becomes available for customer VM provisioning.
This page explains how to add and update templates in CMP, configure template properties, and understand the purpose of each configuration option.
Ensure the following before configuring a template in CMP:
- The template has been created and validated at the orchestrator level
- The template meets all CMP compatibility requirements
- For CloudStack, the template is marked Public and Featured
- The appropriate Cloud Provider Setup and zone are already configured in CMP
Template re-configuration
Template inventory in CMP is not updated automatically when the orchestrator changes. CMP does not provide a self-service Sync option for templates.
Any template created, modified, or removed at the orchestrator level must be re-configured manually in CMP.
Changes made directly in CloudStack (or other orchestrators) are not automatically reflected in CMP. After creating, updating, or deleting templates at the orchestrator level, an administrator must re-configure templates manually in CMP under Settings → Orchestrator → Templates.
Initial setup (Wizard Step 4)
During first-time Cloud Provider setup, configure templates in Wizard Step 4 — Template. See Connecting CMP to CloudStack.
Creating or editing a template
After templates are available for configuration in CMP:
- Log in to the CMP Admin Panel
- Navigate to Settings → Orchestrator → Cloud Provider Setup (or Settings → Orchestrator → Templates)
- Select the correct Cloud Provider Setup and zone
- Open the template to create or edit
- Configure the fields described below
- Set Status to Active and click Save
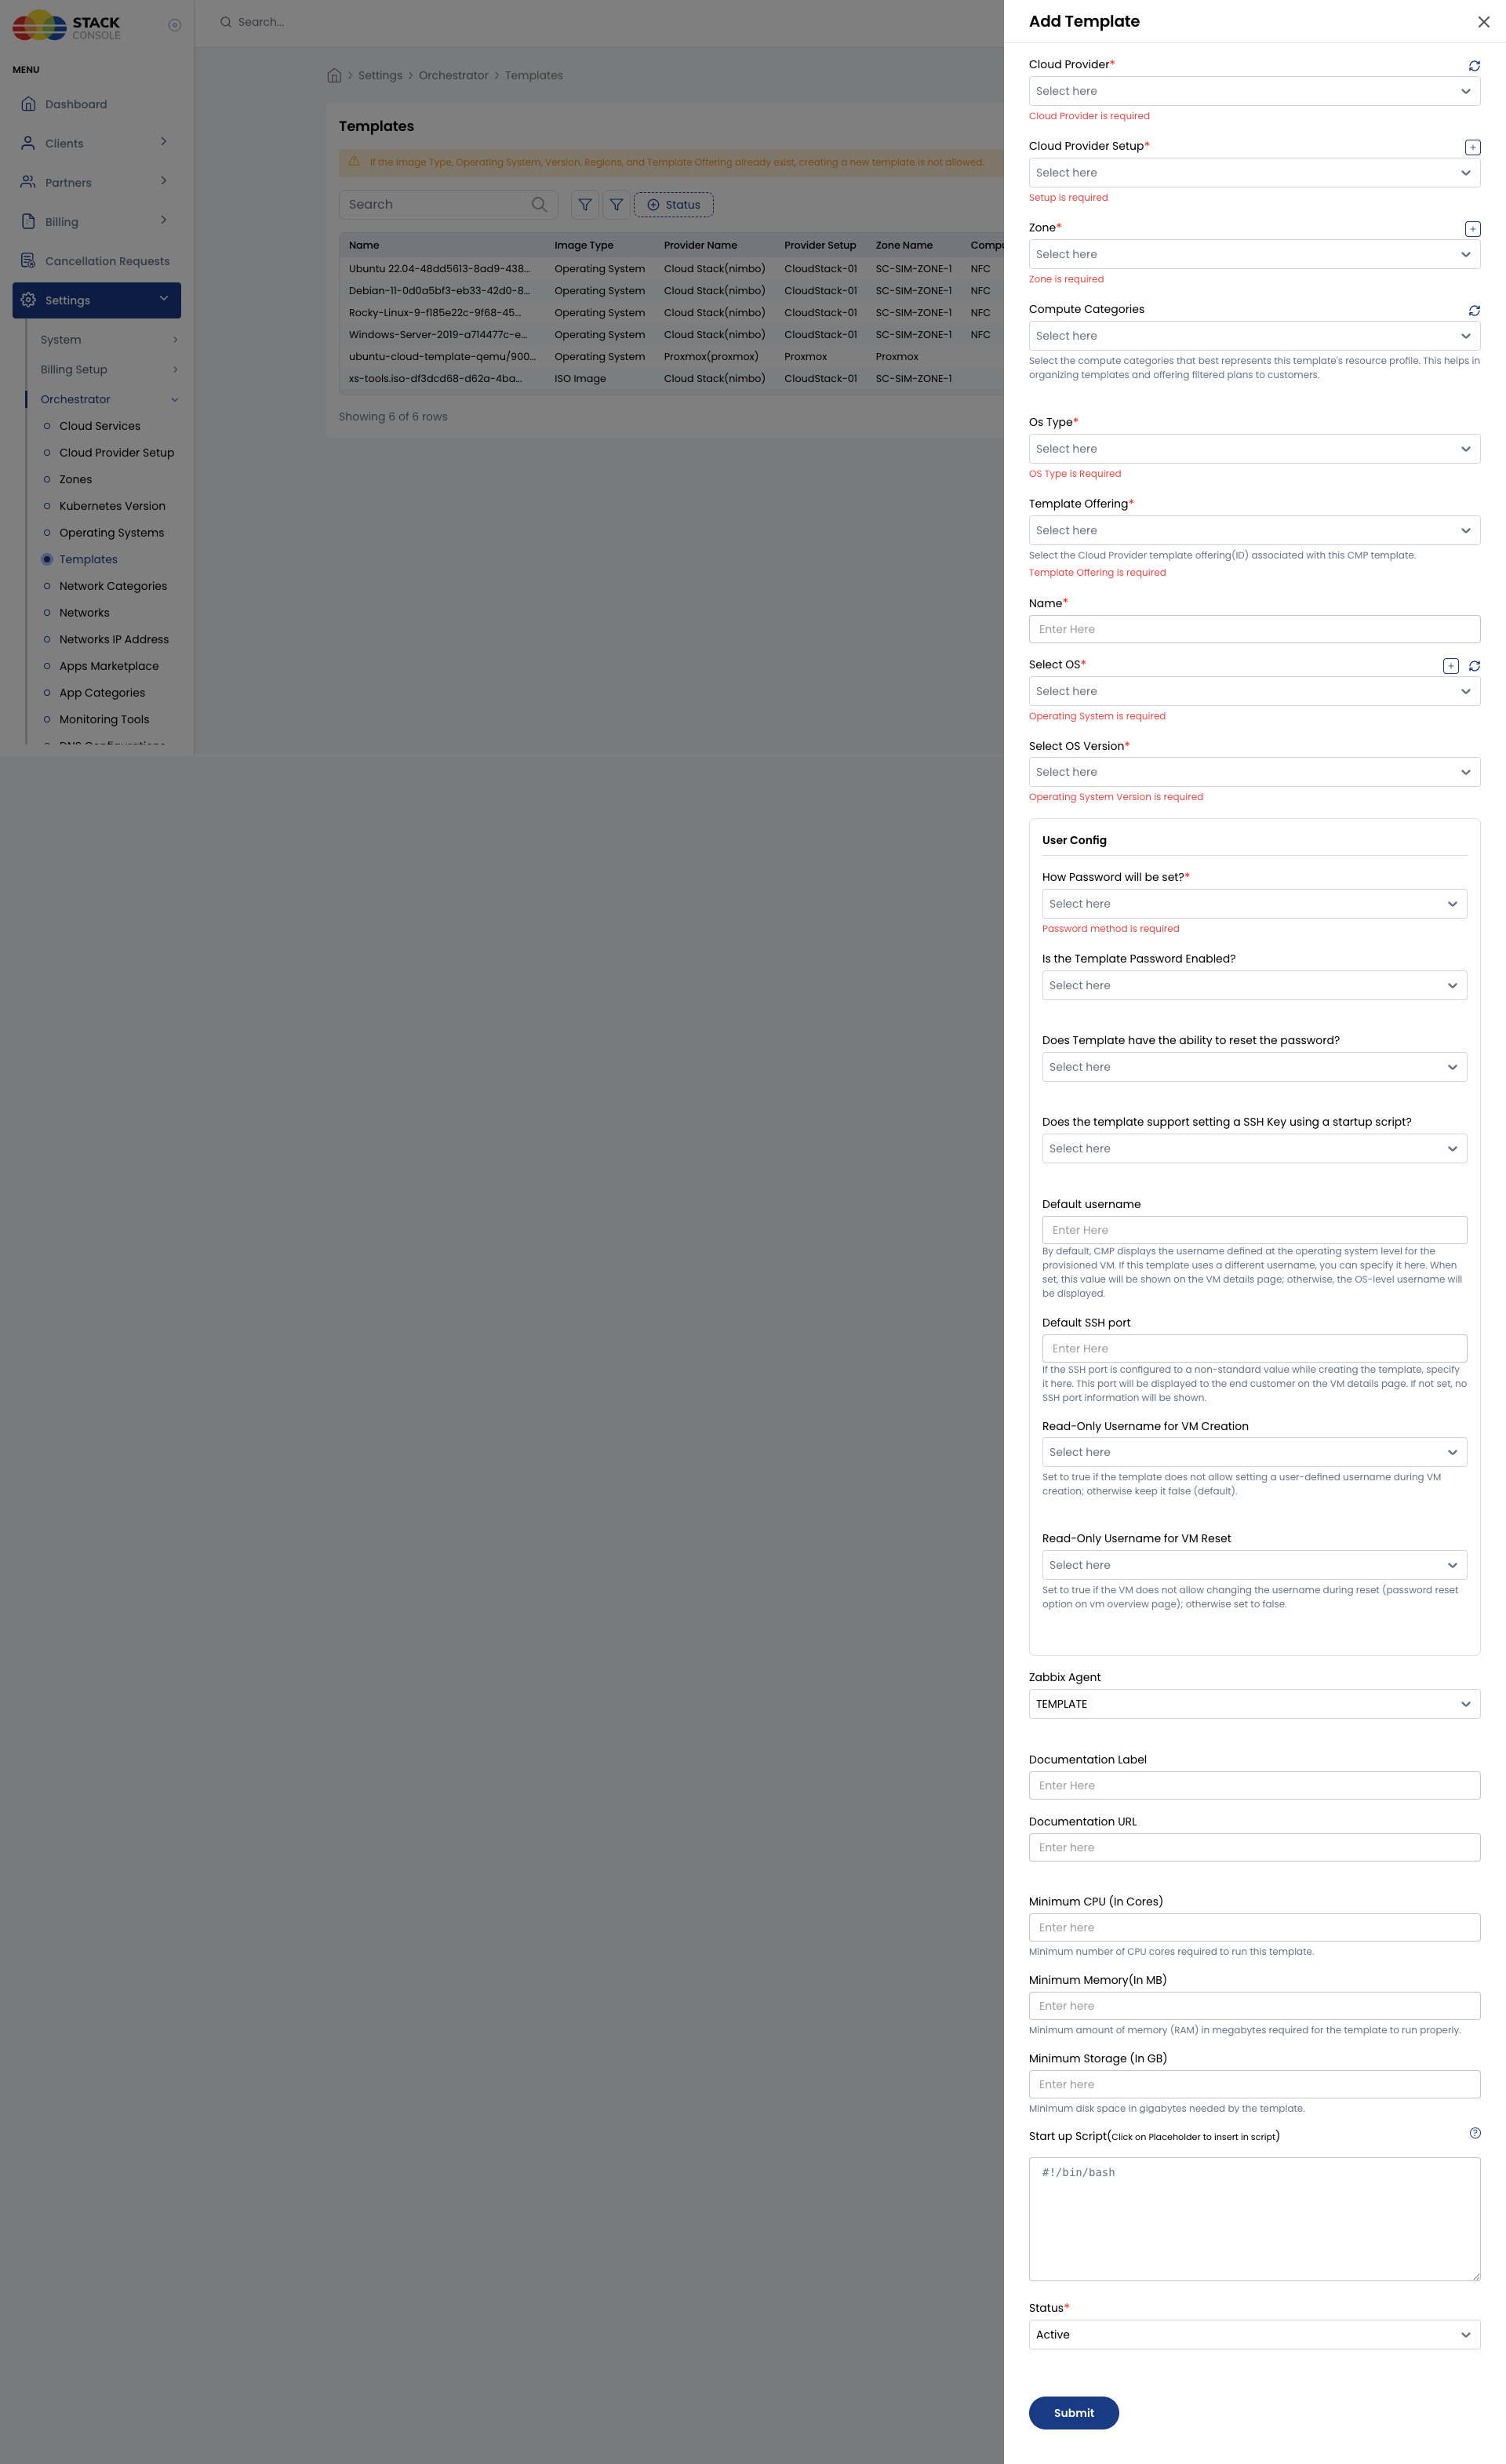
Cloud Provider, Cloud Provider Setup, and Zone
These three fields define where the template is available in CMP:
- Cloud Provider — the orchestrator type (CloudStack, OpenStack, and so on)
- Cloud Provider Setup — the specific configured instance of that orchestrator
- Zone — the deployment zone within that setup
Templates are configured independently per zone. Even if CloudStack shares a template across zones, create a separate CMP template entry for each zone where customers should provision VMs.
Compute category (optional)
Select one or more Compute Categories that best represent this template's resource profile.
Compute Categories group templates and packages for filtering and presentation within CMP. They help organize templates and offer filtered plans to customers. This setting has no direct dependency on the orchestrator.
- Configuring Compute Categories is optional
- Once a category is used for any package or template, apply it consistently across all related templates and packages in the same zone
Compute Categories are primarily used for organization and filtering in the customer portal. See CloudStack Packages for how compute categories relate to package mapping.
Template type and image type
Template Type
Select the provisioning workflow CMP uses during VM creation.
| Value | Description |
|---|---|
| Operating System/Template | Standard VM template used for virtual machine provisioning |
| ISO | ISO image used for ISO-based deployment workflows |
Image Type
Required classification of the image — typically Operating System for standard OS templates. Set according to how the template should be categorized in CMP.
Template offering
Select the Cloud Provider template offering (ID) associated with this CMP template. The dropdown lists orchestrator templates available for the selected Cloud Provider Setup and zone.
Example offering value: Debian-11-0d0a5bf3-eb33-42d0-87be-e073d602f9f8
CloudStack
For CloudStack integrations, only templates marked Public and Featured appear in the offering list.
When a template is recreated or modified in CloudStack, the underlying offering ID may change. After orchestrator-side changes, verify the correct offering is still mapped in CMP.
Name, operating system, and version
Name
Internal name used by administrators — for example, Debian-11. End customers see Select OS and Select OS Version, not this field.
Select OS
Choose the operating system family. Add missing entries from Settings → Operating System before continuing.
Select OS Version
Version displayed to customers during VM provisioning. Use clear labels customers will recognize.
Other configuration
The User Config section controls how CMP provisions login access for VMs created from this template.
How Password will be set?
| Method | Supported platforms |
|---|---|
| Using Template | CloudStack, OpenStack |
| Using Startup Script | VMware, Proxmox, OpenStack (Linux) |
For CloudStack, select Using Template. Templates must be Password Enabled in CloudStack. CMP does not send a password in the deployVirtualMachine request — CloudStack generates it and CMP stores the result on the VM record.
See Preparing CMP-Compatible Templates for CloudStack-side requirements.
Is the Template Password Enabled?
Controls whether password-related fields appear on the VM provisioning form and whether CMP manages passwords for this template.
Does the Template have the ability to reset the password?
Enable when password reset via orchestrator API should be available on the VM details page after deployment — even if the template is not password-enabled in the CloudStack sense.
Does the template support setting an SSH Key using a startup script?
Enable when the template supports SSH public key injection during provisioning via startup script or orchestrator-native mechanisms.
Default username
As a CloudStack admin, set the correct default login username when you configure templates in CMP. This value is informational only — CMP shows it to end customers on the VM details page so they know which account to use. CMP does not create, modify, or validate users at the template level; the actual login user must exist inside the VM image and be configured in CloudStack as part of your template preparation.
Recommended defaults — match the username baked into the OS image:
| Operating system | Typical default username |
|---|---|
| Ubuntu | ubuntu |
| CentOS / Rocky / AlmaLinux | centos or cloud-user (match your image) |
| Debian | debian |
| Windows | Administrator |
Set the username once at the operating system level in CMP (Settings → Operating System) for all templates of that OS — for example, ubuntu for every Ubuntu template. Most deployments only need this OS-level setting.
Use the template-level Default username field only when a specific template uses a different login user than the OS default — for example, one custom Ubuntu image that logs in as appuser instead of ubuntu.
How CMP resolves the displayed username:
- If Default username is set on the template → CMP shows that value.
- If the template field is empty → CMP uses the username from the linked Operating System entry.
Ensure the username shown in CMP matches the user that actually exists in the VM. Wrong values confuse customers at login time; fixing them requires updating the OS-level or template-level setting in CMP — not a CloudStack API action by CMP.
Default SSH port
If SSH listens on a non-standard port in this template, enter it here — for example, 22. The port is shown to end customers on the VM details page. If left empty, no SSH port information is displayed.
Read-Only Username for VM Creation
| Value | Behavior |
|---|---|
| No (default) | Customers can set or change the username during VM creation |
| Yes | Username is fixed — customers cannot enter a custom username at provisioning time |
Read-Only Username for VM Reset
| Value | Behavior |
|---|---|
| No (default) | Username can be changed during password reset on the VM overview page |
| Yes | Username is locked during password reset operations |
Zabbix Agent (deprecated)
The Zabbix Agent field is deprecated. Leave at default or skip — do not configure for new templates.
Documentation Label and URL
These fields provide custom documentation links for end users on the VM details page.
| Field | Description |
|---|---|
| Documentation Label | Display name shown to the end user |
| Documentation URL | Link to operating system docs, application setup guides, or post-deployment instructions |
Minimum resource requirements
When you define VM packages in CMP, offerings can start at small sizes — for example, 2 vCPU and 2 GB RAM. Some templates or applications need more resources to run reliably (heavy OS images, database templates, Marketplace apps, and so on).
Use the minimum resource fields on the template to tell CMP which packages are valid for that template. During VM provisioning, CMP compares each available package against these minimums and shows only packages that meet or exceed them.
| Field | Description | Example |
|---|---|---|
| Minimum CPU (cores) | Lowest vCPU count required to provision this template | 4 for a database or application template |
| Minimum Memory (MB) | Lowest RAM required to provision this template | 8192 for 8 GB minimum |
| Minimum Storage (GB) | Lowest root disk size required for this template | 40 when the template or app needs a larger root volume |
Leave a field empty or at zero if the template has no minimum for that resource — CMP will not filter packages on that dimension.
If Minimum CPU is set to 4, a customer selecting this template will see packages with 4 or more vCPUs only — packages with 2 vCPU are hidden. The same logic applies to memory and storage when those minimums are configured.
This prevents customers from provisioning VMs that cannot satisfy the template's resource requirements and reduces failed deployments due to undersized packages.
Startup script (CloudStack only)
The Start-up Script field allows administrators to associate a startup script with the template. Click Placeholder in the editor to insert supported variables into the script.
This feature is primarily used for Marketplace applications and advanced guest initialization scenarios.
Marketplace apps require startup script support on the template. See Preparing CMP-Compatible Templates.
Default firewall allowed ports (CloudStack only)
CMP can automatically create default firewall rules immediately after VM provisioning using orchestrator APIs. Rules are created at the public IP address firewall level.
Configure ports in the Default Firewall Allowed Ports section:
| Protocol | How to add |
|---|---|
| TCP | Enter port number and click + Add — repeat for each TCP port |
| UDP | Enter port number and click + Add — repeat for each UDP port |
If no ports are configured, CMP creates default rules for:
- TCP 22 (SSH)
- TCP 3389 (RDP)
- ICMP
The global setting enable_default_firewall_ports can be set to false to disable this default behavior.
The Cloud Provider Setup includes an option to automatically create default egress rules. When enabled, CMP creates an Allow All outbound rule during VM provisioning. Disable this option if you do not want default egress rules created automatically.
Status
Use Status to control whether the template is available for customer provisioning.
| Status | Behavior |
|---|---|
| Active | Template is available in customer VM creation workflows |
| Inactive | Template remains configured in CMP but is hidden from customer provisioning |
Validation checklist
Before making a template available to customers, verify:
- Orchestrator-side template meets CMP compatibility requirements
- Template has been re-configured in CMP for the correct Cloud Provider, Cloud Provider Setup, and Zone
- Template Offering maps to the correct CloudStack template ID
- Operating System, Version, and Image Type are configured correctly
- User Config — password method, password enabled, reset, and SSH key settings match the template
- Default username and Default SSH port are set if the template uses non-default values
- Read-Only Username flags match your provisioning policy
- Minimum resource requirements are defined if applicable
- Default firewall allowed ports (TCP/UDP) are configured as required
- Status is set to Active