Storage Settings
Storage settings map CloudStack disk offerings to CMP storage categories so customers can choose storage tiers (for example, SSD or NVMe) when creating VMs and volumes.
CMP uses storage settings for logical segregation, pricing, and quota enforcement. Packages that include storage — VM root disk (when override disk is enabled), Volumes, and Unit Pricing — are scoped per Storage Category.
CMP path: Settings → Orchestrator → Provider Setup → Configure → Step 5 — Storage Setting, or Settings → Orchestrator → Storage Settings
Ensure the following before adding storage settings:
- Cloud Provider Setup is in progress or complete through Wizard Step 4 (Templates)
- Zones are configured for the CloudStack instance
- Disk offerings exist in CloudStack for each storage tier you want to sell — see CloudStack prerequisites below
- Enable Override Disk Offering is set to Yes in Provider Config (recommended) if root disk size is selected separately at VM creation
Keep storage settings in sync with Cloud Services
Whenever you add, edit, or disable a storage setting, also update the corresponding services in Cloud Services and Cloud Provider Setup (Wizard Step 1).
CMP manages quotas individually for each storage type (for example, SSD Storage, NVMe Storage, HDD Storage). VM Packages are strongly dependent on storage settings — if you disable a storage setting, associated packages are not shown to end customers for that tier.
| Action | Also update |
|---|---|
| Add a new storage tier | Enable the matching SSD / NVMe / HDD Storage service in Cloud Provider Setup Step 1; configure matching quota in Wizard Step 6 |
| Disable a storage setting (Status = Inactive) | Disable the corresponding storage service in Cloud Provider Setup if the tier should no longer be sold |
| Change zone or storage category | Verify VM, Volumes, and Unit Pricing packages still map to the correct Storage Category |
Storage categories in CMP are logical labels for customers (for example, SSD, NVMe, Gold). They must map correctly to CloudStack disk offerings and storage tags.
An incorrect mapping can cause provisioning failures, volumes placed on the wrong storage pool, or billing inconsistencies.
CloudStack prerequisites
In Apache CloudStack, workload placement on specific storage types is controlled at the offering level. CMP passes disk offering IDs at VM and volume creation time — those offerings must target the correct primary storage pools.
CloudStack uses a tag-based mapping mechanism: assign matching tags to both primary storage pools and disk offerings so volumes are provisioned only on storage that meets the defined performance criteria.
Refer to the official CloudStack guides:
Step 1 — Tag primary storage pools
- Log in to the CloudStack UI with admin privileges
- Navigate to Infrastructure → Primary Storage
- Open the storage pool that runs on your SSD, NVMe, or HDD hardware
- On the Details tab, set Storage Tags — for example:
- SSD pool →
ssd - NVMe pool →
nvme - HDD pool →
hdd
- SSD pool →
Tag strings are arbitrary, but ssd, nvme, and hdd are common conventions. The tag on the pool must exactly match the tag on the disk offering.
Step 2 — Create disk offerings
Create one disk offering per storage tier you plan to sell in CMP.
- Navigate to Service Offerings → Disk Offering
- Click Add Disk Offering
- Configure the offering — for example:
- Name:
Premium_NVMe_Storage - Storage Tags:
nvme(must match the primary storage pool tag) - Disk size: fixed size for predefined packages, or enable Custom / Unconstrained Disk Size for custom packages
- Name:
- Optionally set QoS Type to Storage and define Min IOPS / Max IOPS when your storage backend supports it
- Set Public to Yes and assign the target Zone(s)
- Repeat for each tier (SSD, NVMe, HDD, and so on)
For custom VM and volume packages, create custom / unconstrained compute and disk offerings in CloudStack. Copy their offering UUIDs into the Custom Compute Offering ID and Custom Disk Offering ID fields when configuring the matching storage setting in CMP.
Initial setup (Wizard Step 5)
During first-time Cloud Provider setup, add storage settings in Wizard Step 5 — Storage Setting.
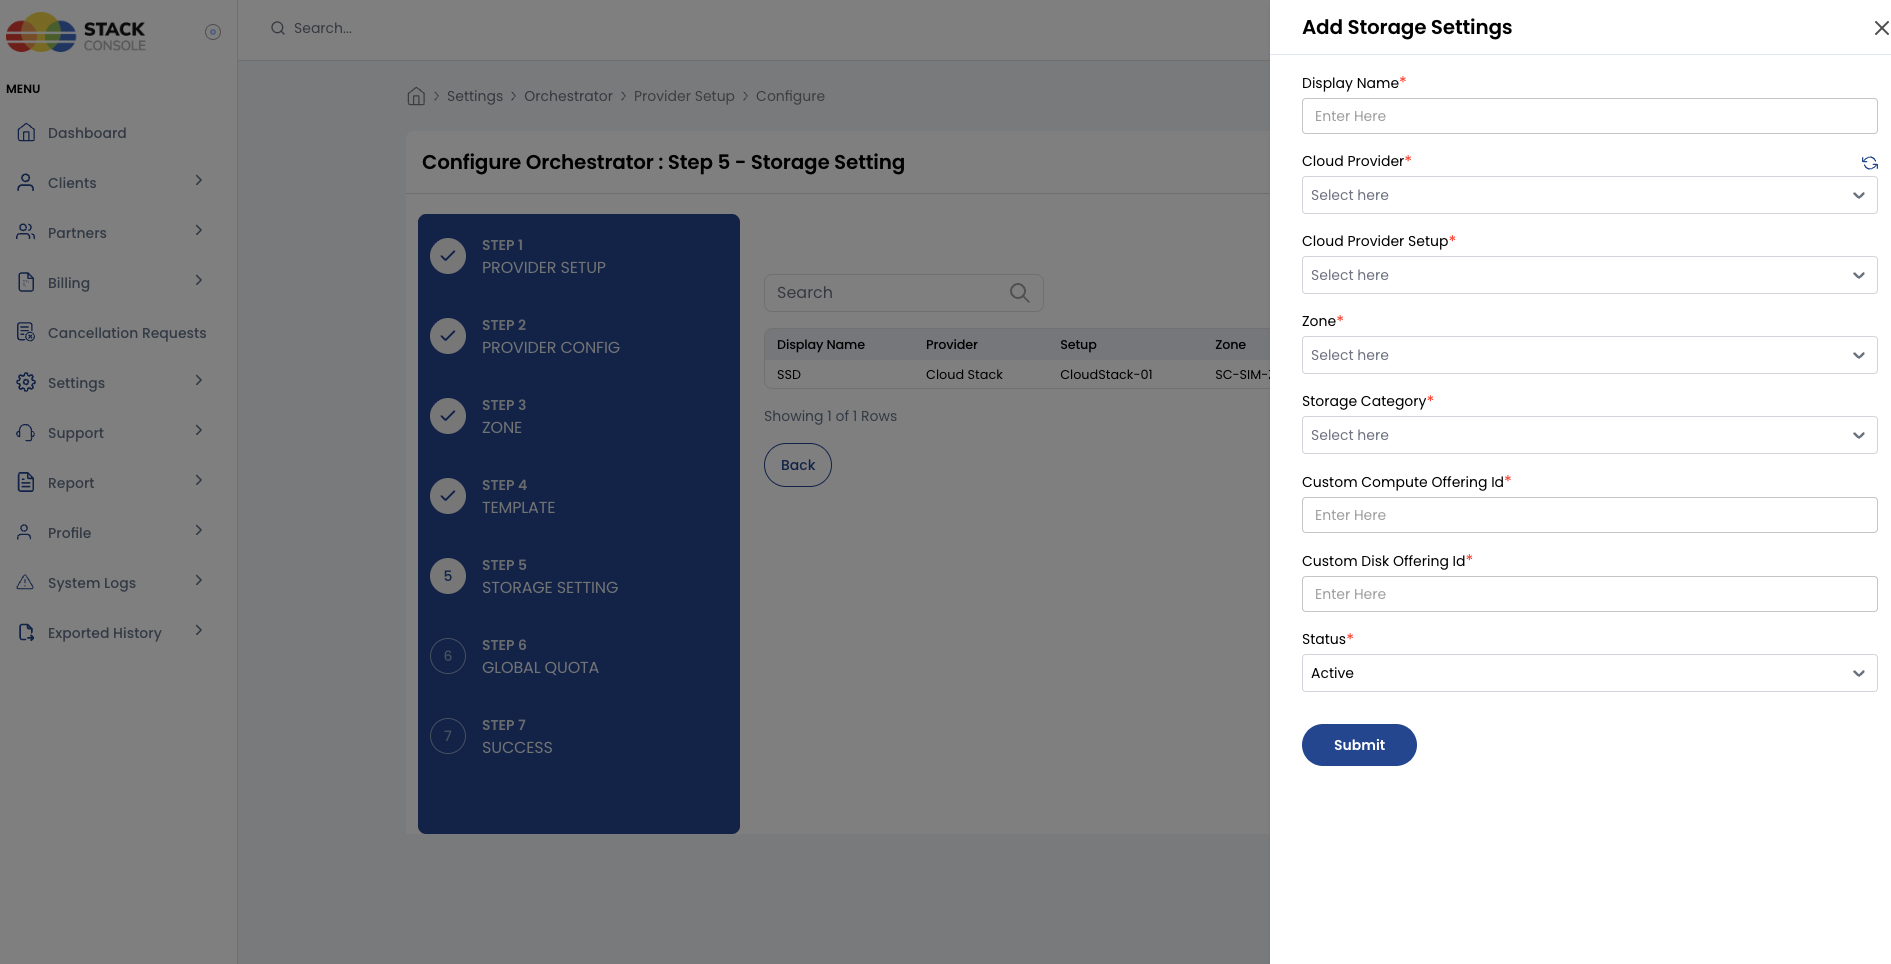
- Complete Steps 1–4 of the Connecting CMP to CloudStack wizard
- On Step 5, review existing storage settings or click Add to open the Add Storage Settings form
- Configure each field described below
- Click Submit & Continue once every storage tier is mapped for each zone
Add at least one storage setting per zone × storage category combination before enabling SSD, NVMe, or HDD Storage services in Wizard Step 1.
Creating or editing a storage setting
- Log in to the CMP Admin Panel
- Navigate to Settings → Orchestrator → Storage Settings (or use Wizard Step 5 during setup)
- Click Add (form title: Add Storage Settings) or open an existing entry to edit
- Complete each field below in the order shown on the form
- Set Status to Active and click Submit
- Update Cloud Provider Setup services and quotas if you added or disabled a tier — see Keep storage settings in sync with Cloud Services
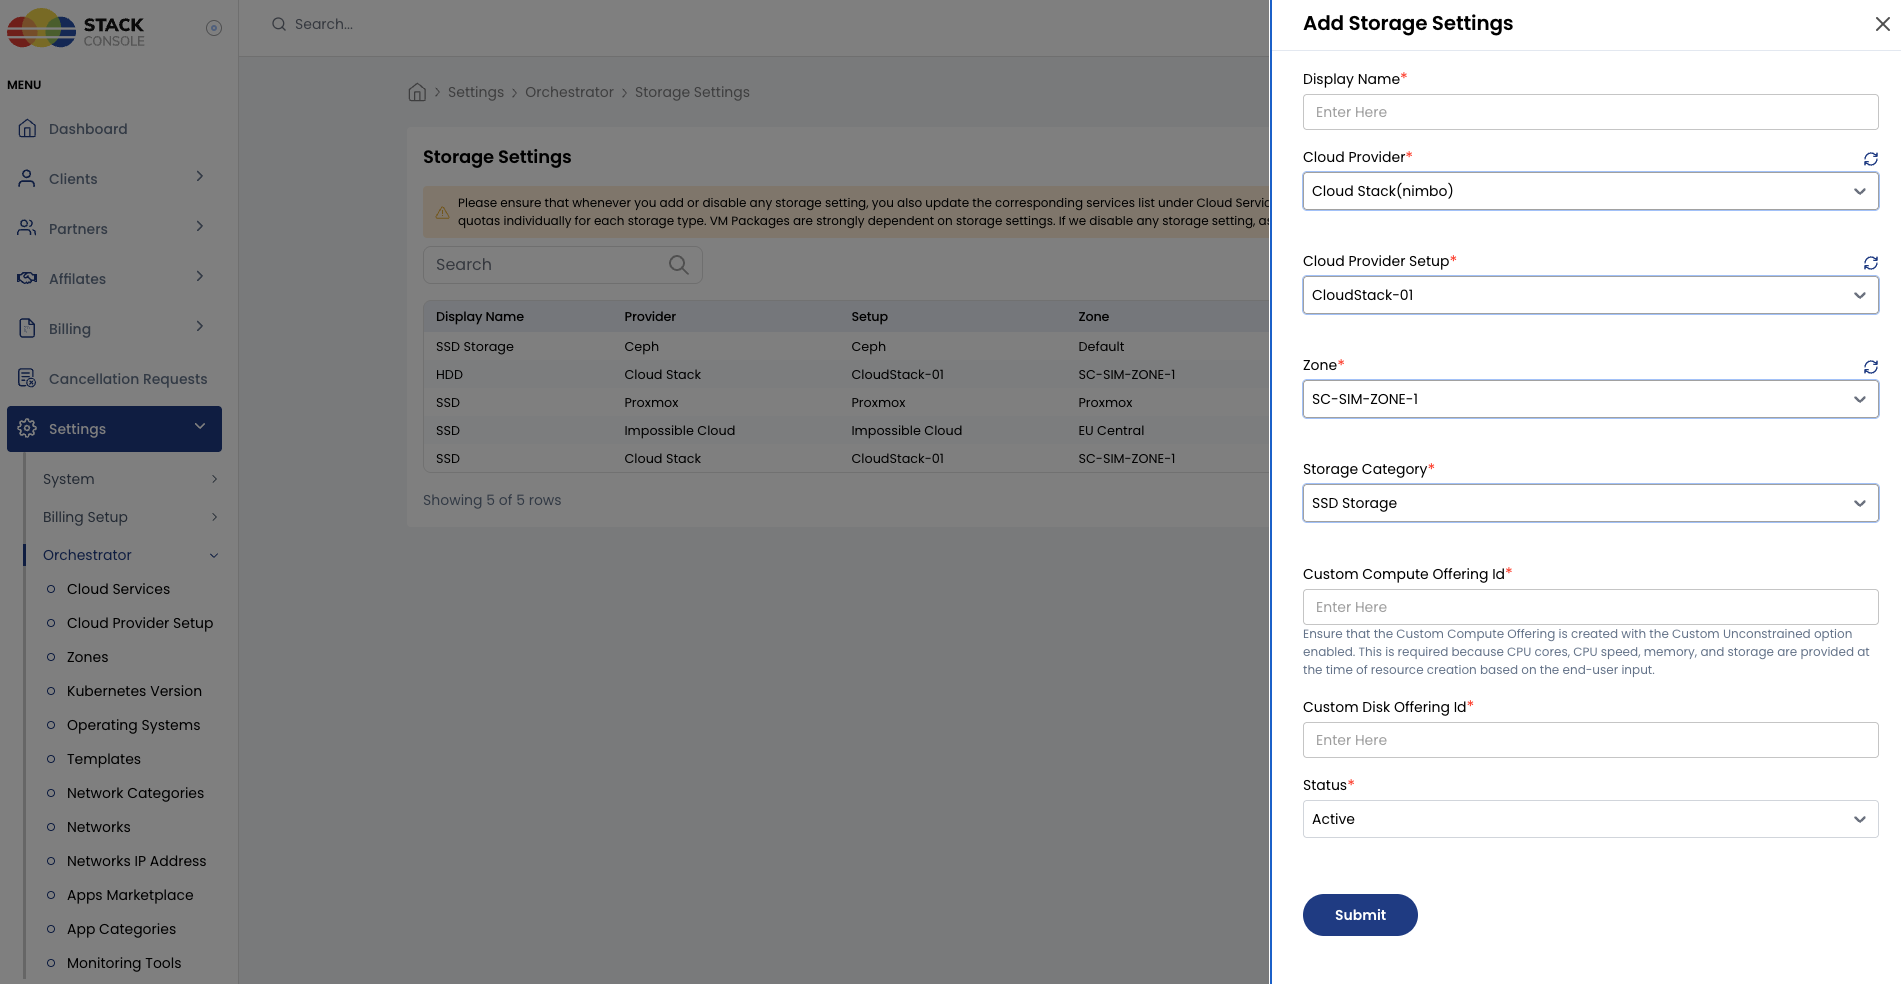
Each field below matches the Add Storage Settings form.
Display Name
Required. Customer-facing label for this storage tier.
When multiple storage settings exist, customers see separate tabs during Create Instance and Create Volume, each labeled with this display name. The selected storage type is also shown on the VM details page.
Examples: SSD, NVMe, Premium Storage, Standard HDD.
Cloud Provider
Required. Select the orchestrator type — for example, CloudStack (Nimbo).
Cloud Provider Setup
Required. Select the CloudStack instance this storage setting belongs to — for example, CloudStack-01.
Storage settings are scoped to a single Cloud Provider Setup. Repeat configuration for each CloudStack environment you operate.
Zone
Required. Select the CMP zone where this storage tier is available — for example, SC-SIM-ZONE-1.
Storage settings are configured per zone. The same storage category (for example, SSD) in two zones requires two separate storage setting entries if both zones should offer that tier.
Storage Category
Required. Select the CMP storage classification for this tier — for example, SSD Storage.
Storage categories are predefined in CMP. They are used when:
- Scoping VM and Volumes packages
- Enforcing per-tier quotas in Global Quotas (for example, SSD Storage in GB)
- Driving Unit Pricing for custom storage
Packages are unique per Cloud Provider + Setup + Zone + Storage Category. Create separate package entries for each storage category even when the underlying CloudStack disk offering name is the same.
If you need a custom category name beyond the predefined list, contact StackConsole to have it added.
Custom Compute Offering ID
Required. CloudStack UUID of the custom / unconstrained compute offering CMP uses when a customer provisions a VM with custom CPU and RAM values.
Ensure the custom compute offering is created in CloudStack with the Custom Unconstrained option enabled. This is required because CPU cores, CPU speed, memory, and storage are provided at resource creation time based on end-user input.
Custom Disk Offering ID
Required. CloudStack UUID of the custom / unconstrained disk offering CMP uses when:
- A customer selects a custom root disk size at VM creation (override disk enabled)
- A customer creates an additional volume with a custom size
This must map to a disk offering in CloudStack with Custom / Unconstrained Disk Size enabled and storage tags that match your primary storage pools.
Status
Required. Controls whether this storage setting is available for package mapping and customer provisioning.
| Status | Behaviour |
|---|---|
| Active | Storage tier appears in the customer portal and can be linked to packages |
| Inactive | Hidden from customers — associated VM and volume packages for this tier are not shown; disable the matching storage service in Cloud Provider Setup if retiring the tier |
Enable storage services in Cloud Provider Setup
Before customers can provision storage-backed resources, enable the matching services in Wizard Step 1 — Cloud Provider Services when connecting CloudStack:
| Service | Purpose |
|---|---|
| SSD, NVMe, HDD Storage | Root disk and block storage tiers — requires storage settings to be configured first |
| Block Storage | Additional data volumes |
Keep this service list in sync whenever you add or disable storage settings — see Keep storage settings in sync with Cloud Services.
CMP does not allow you to enable SSD, NVMe, or HDD Storage services in Step 1 until the corresponding storage settings are configured in Step 5.
Map storage settings to packages
After storage settings are active, bind them to rate card packages:
| Package type | CMP path | Notes |
|---|---|---|
| Virtual Machine | Packages → Virtual Machine | Select the matching Storage Category on each VM package when override disk is enabled |
| Volumes | Packages → Volumes | Map predefined disk offerings to volume packages per storage category |
| Unit Pricing | Packages → Unit Pricing | Set per-GB pricing for each storage category used by custom packages |
See CloudStack Packages for package configuration details.
Customer portal view
When multiple storage categories are configured, the Create Instance and Create Volume pages show separate tabs — one per storage setting Display Name.
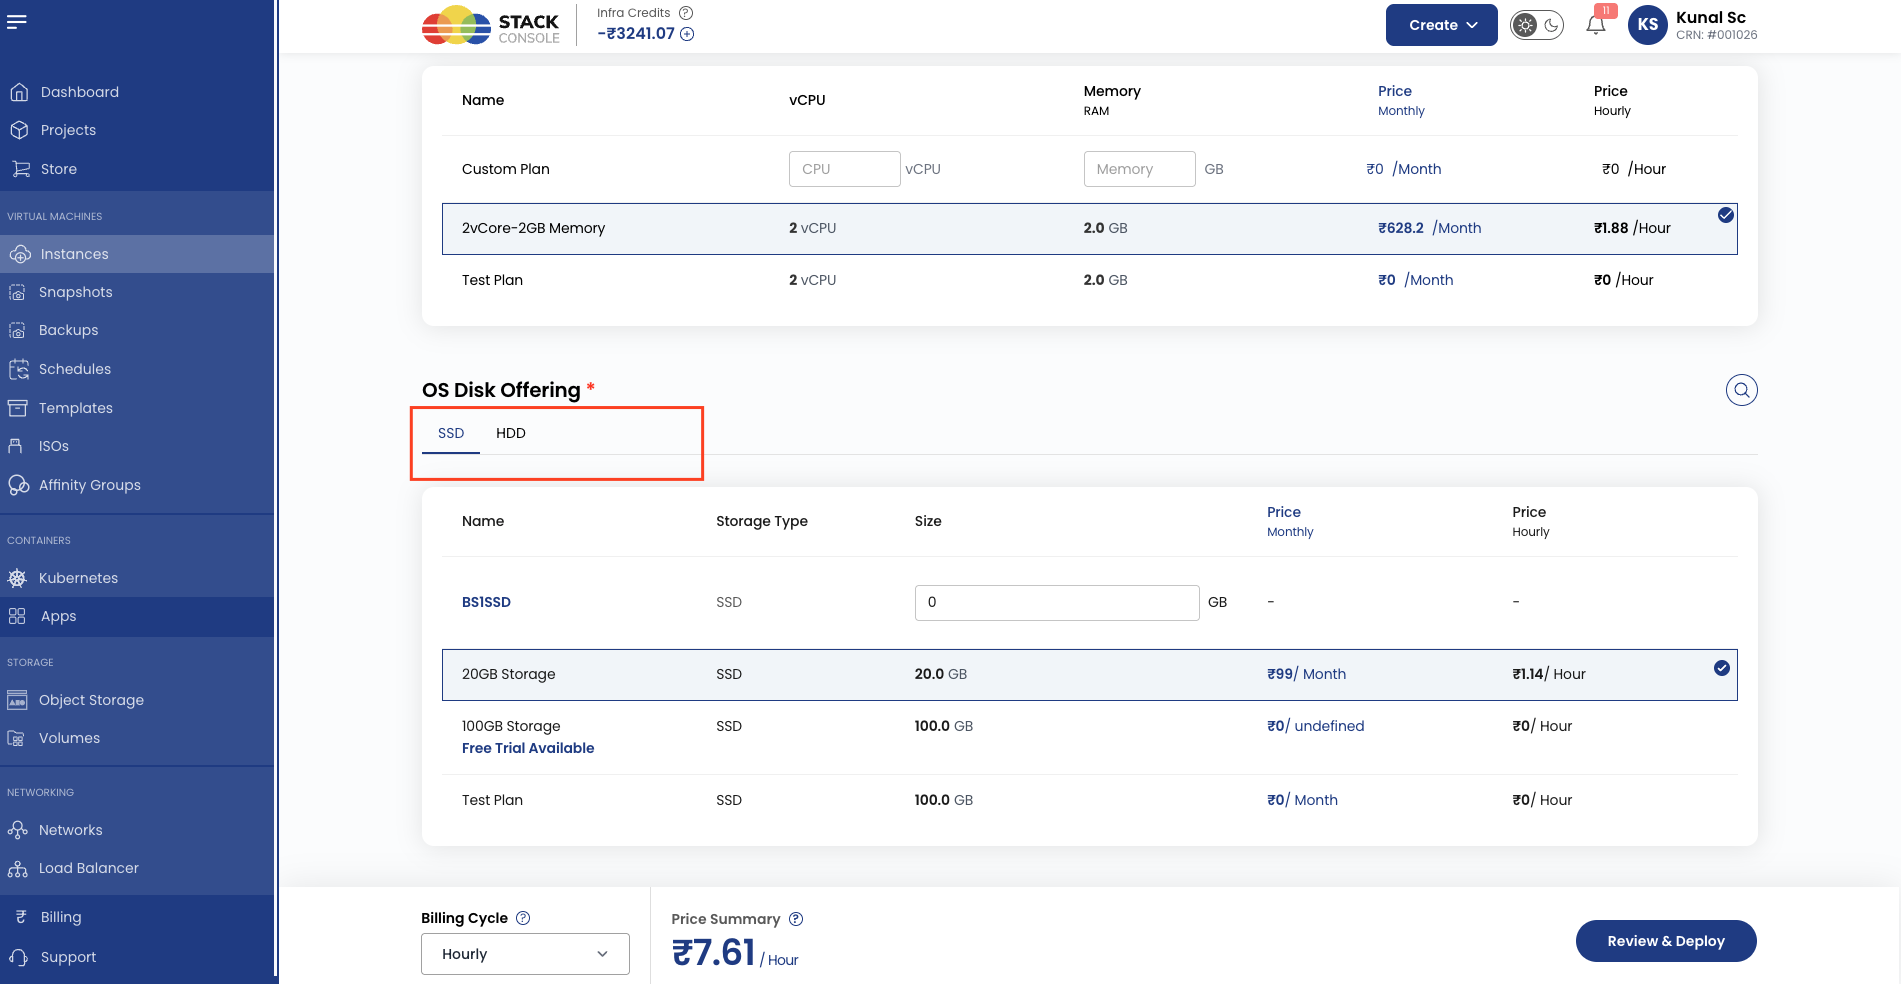
Customers select a tab to filter VM packages and root disk options for that storage tier.
Validation checklist
Before making a storage tier available to customers, verify:
- Primary storage pools in CloudStack are tagged correctly (
ssd,nvme,hdd, or your chosen strings) - Disk offerings exist with matching Storage Tags and are Public in the target zone
- A storage setting exists in CMP for each zone × storage category combination
- Custom Compute Offering ID and Custom Disk Offering ID are set — both use Custom Unconstrained offerings in CloudStack
- Matching storage service (SSD / NVMe / HDD Storage) is enabled in Cloud Provider Setup Step 1
- Per-tier quotas are configured in Wizard Step 6 and Global Quotas for each active storage type
- Matching Volumes and/or VM packages are created with the correct Storage Category
- Unit Pricing is configured for each storage category used by custom packages
- Global quota limits for SSD Storage (and other tiers) are set appropriately in Wizard Step 6 and Global Quotas