Load Balancer Packages
Load Balancer packages define how CMP bills customers for network-level load balancing in CloudStack. In CloudStack, load balancers operate at the network and public IP layer — the virtual router distributes traffic to backend VMs using load balancer rules.
CMP typically uses one load balancer package per Cloud Provider + Setup + Zone combination. Pricing applies when customers create load balancer rules from the CMP portal.
Ensure the following are already configured:
- Cloud Provider Setup is connected, with Load Balancer enabled in Wizard Step 1
- Zones are mapped in CMP
- Network offerings in CloudStack include the Load Balancer service — usually via VPC offerings or isolated network offerings with LB enabled on the virtual router
- Customers have VMs with public IPs or are operating inside a VPC/isolated network that supports load balancing
CMP path: Settings → Billing Setup → Rate Cards → Default → Packages → Load Balancer
How load balancing works in CloudStack
CloudStack does not deploy a separate load balancer appliance for standard network LB. Instead, the virtual router for the network or VPC handles load balancing when the network offering (or VPC offering) includes the Load Balancer service.
Network / VPC offering → Virtual router with LB service → Load balancer rules on public IP
| Component | Role |
|---|---|
| Network offering / VPC offering | Enables Load Balancer as a supported service on the virtual router |
| Virtual router | Runs LB algorithms and distributes traffic to backend VMs |
| Public IP | Target IP for the load balancer rule — customers associate rules with acquired IPs |
| CMP package | Defines per-zone pricing when customers create or use load balancer rules |
VPC Source NAT IP and load balancing
In CloudStack, a VPC Source NAT public IP cannot be used for load balancer rules. Source NAT is reserved for outbound NAT from the VPC, not for LB traffic distribution.
CMP does not enforce this at the UI level. When creating a load balancer, CMP does not filter or validate the IP dropdown against CloudStack LB eligibility rules. Customers may see public IPs that CloudStack will not accept for load balancing.
What customers need: To run a load balancer on a VPC, customers must select a separately acquired public IP (for example, via Static NAT) — not the VPC Source NAT address. If an ineligible IP is used, provisioning fails at the CloudStack layer.
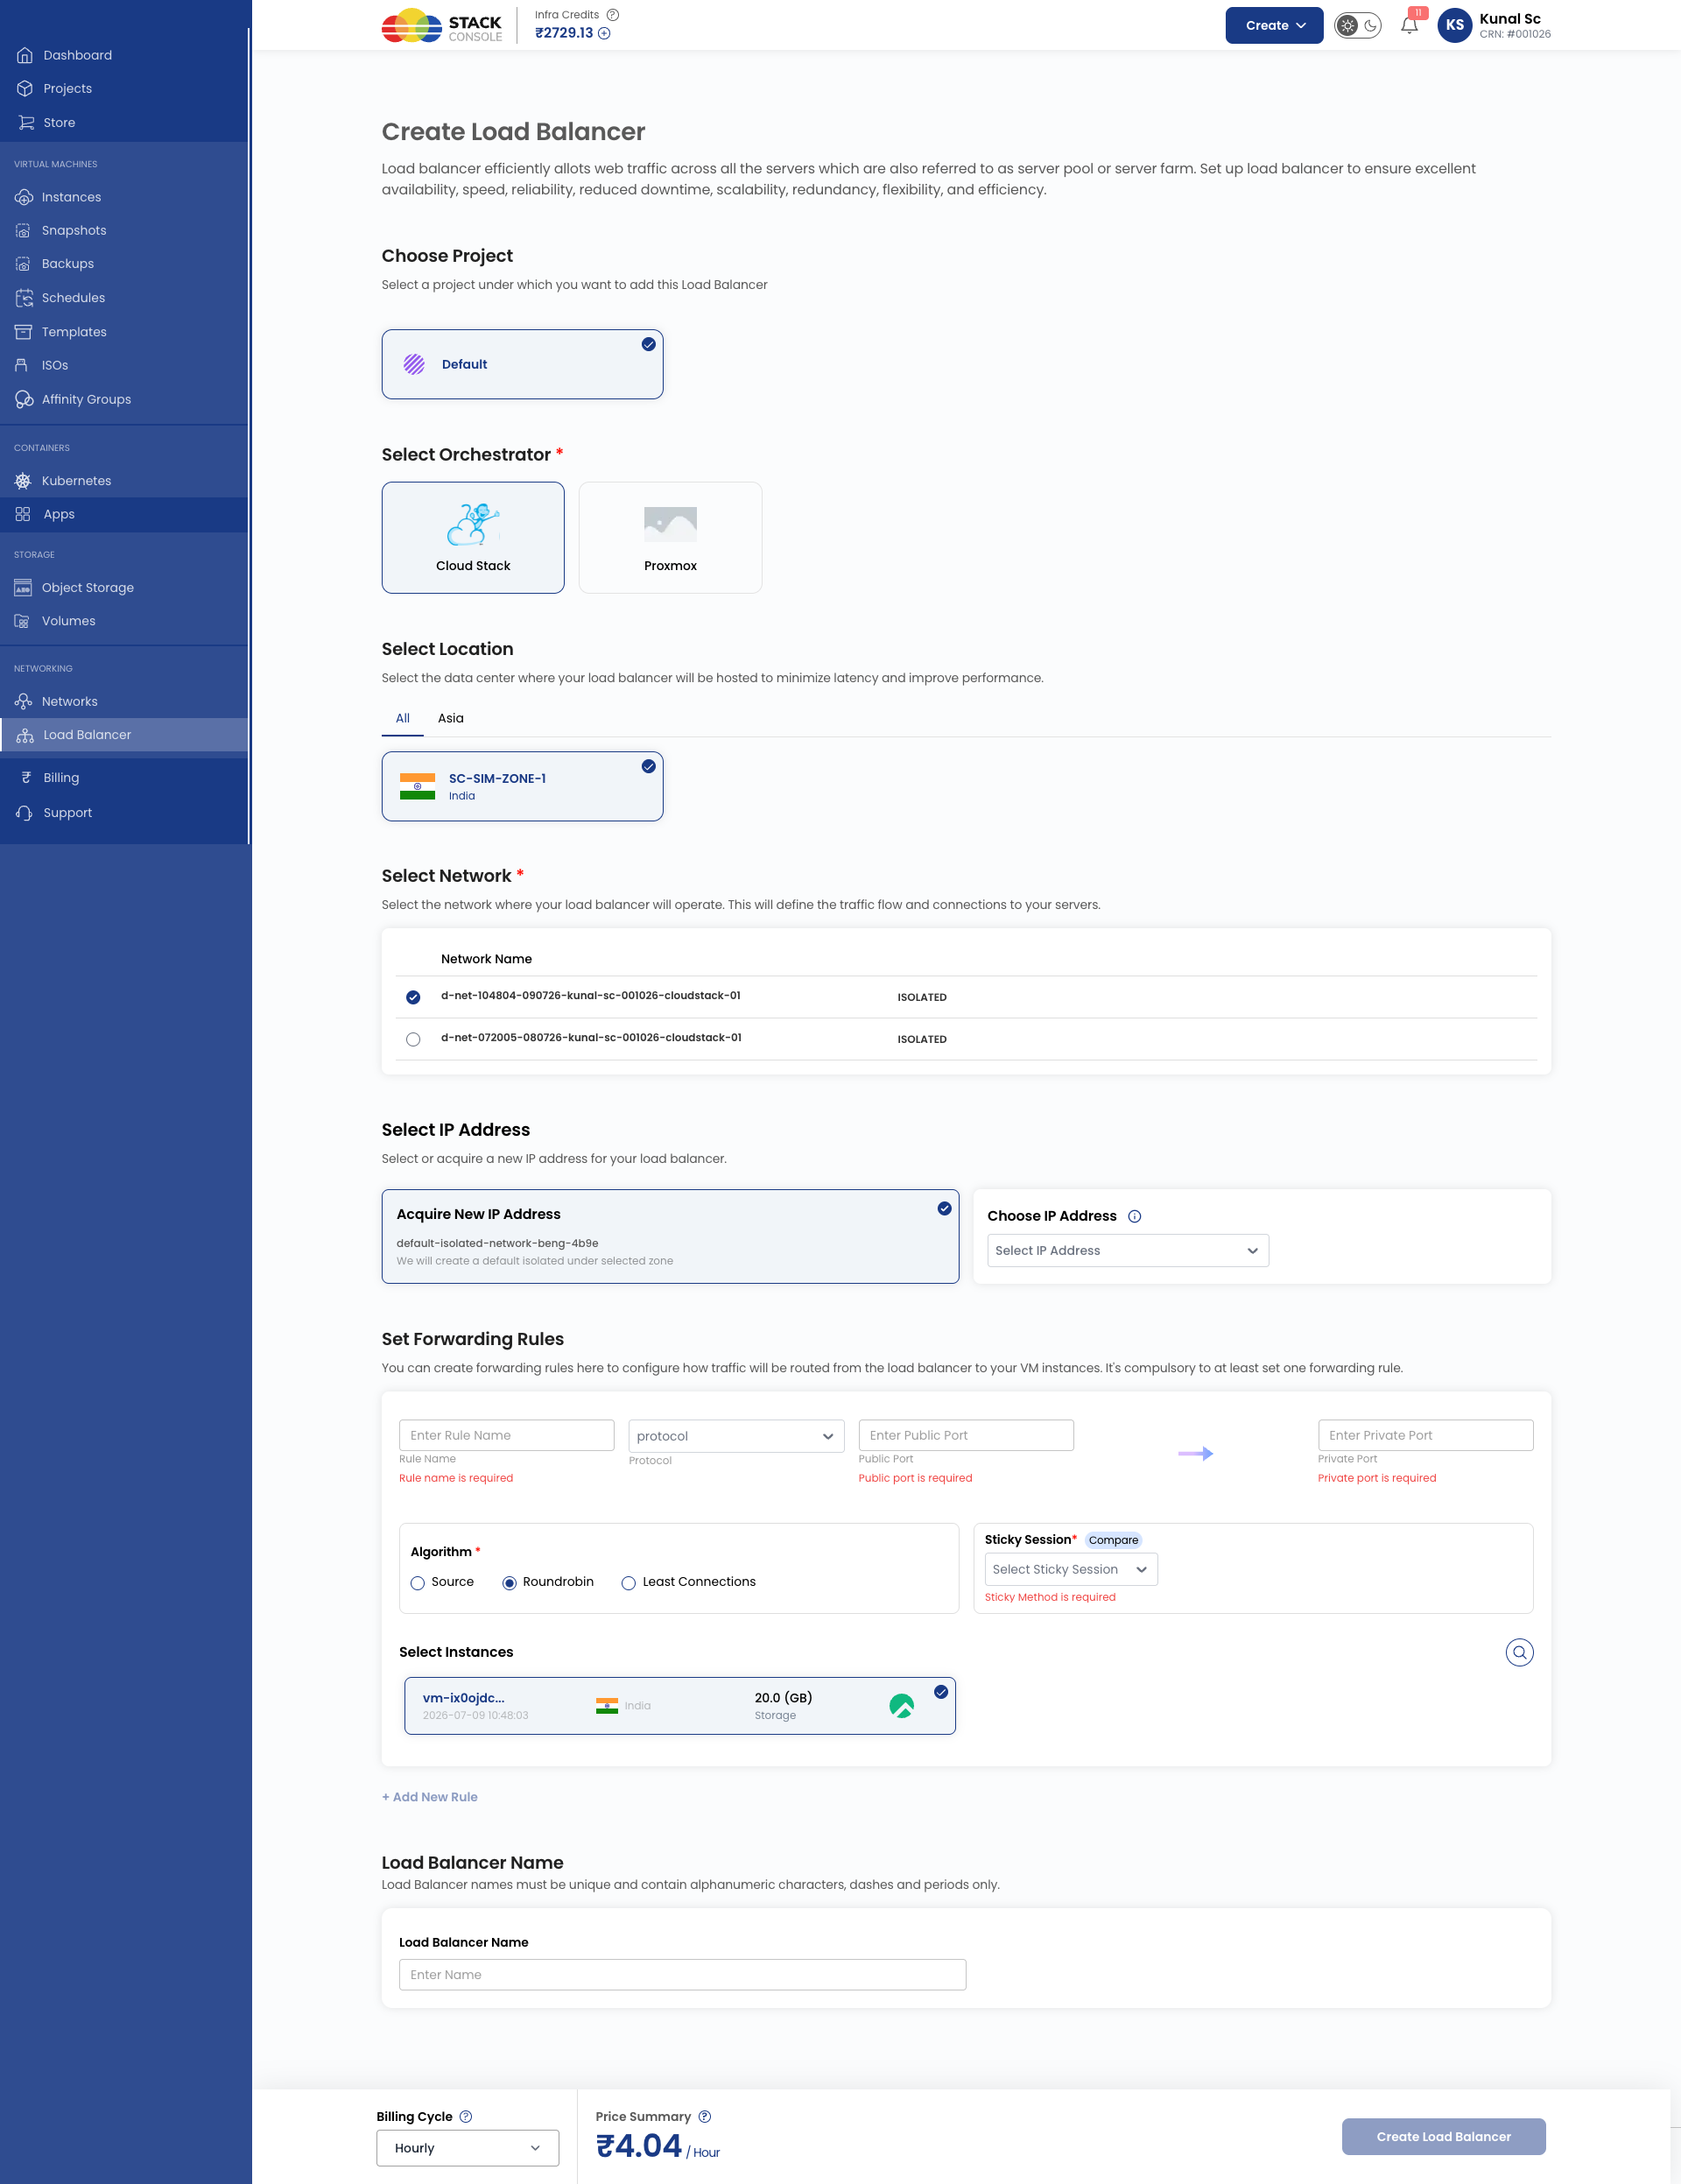
Customers create and manage load balancers from the dedicated Load Balancer service in the CMP portal — not from the Network or IP Address pages.
CMP provides a separate Load Balancer creation and management section. There is no option to create a load balancer from an IP address detail page.
Refer to the Apache CloudStack networking guide.
CloudStack prerequisites
Load balancer capability is enabled through network offerings, not a standalone LB offering type.
Ensure Load Balancer service is available
- Log in to the CloudStack UI with admin privileges
- Verify your VPC offerings or isolated network offerings include Load Balancer in supported services
- For VPC deployments, create or update a VPC offering that enables:
- Load Balancer
- Source NAT and Static NAT (required for public IP association)
- Other services your customers need (DHCP, DNS, Port Forwarding, VPN)
- Link an appropriately sized system service offering to the VPC offering if the virtual router will handle heavy LB traffic — see Virtual Router/VPC
When the virtual router acts as a load balancer for many backend VMs, allocate more CPU on the linked system service offering. Heavy LB workloads are CPU-intensive.
Configure Load Balancer packages in CMP
After CloudStack networking supports load balancing, create one CMP package per Cloud Provider + Setup + Zone where you want to charge for LB usage.
- Open Settings → Billing Setup → Rate Cards → Default → Packages → Load Balancer
- Click Add Package (form title: Create VM Load Balancer Package)
- Complete each field below in the order shown on the form
- Set Status to Active and save
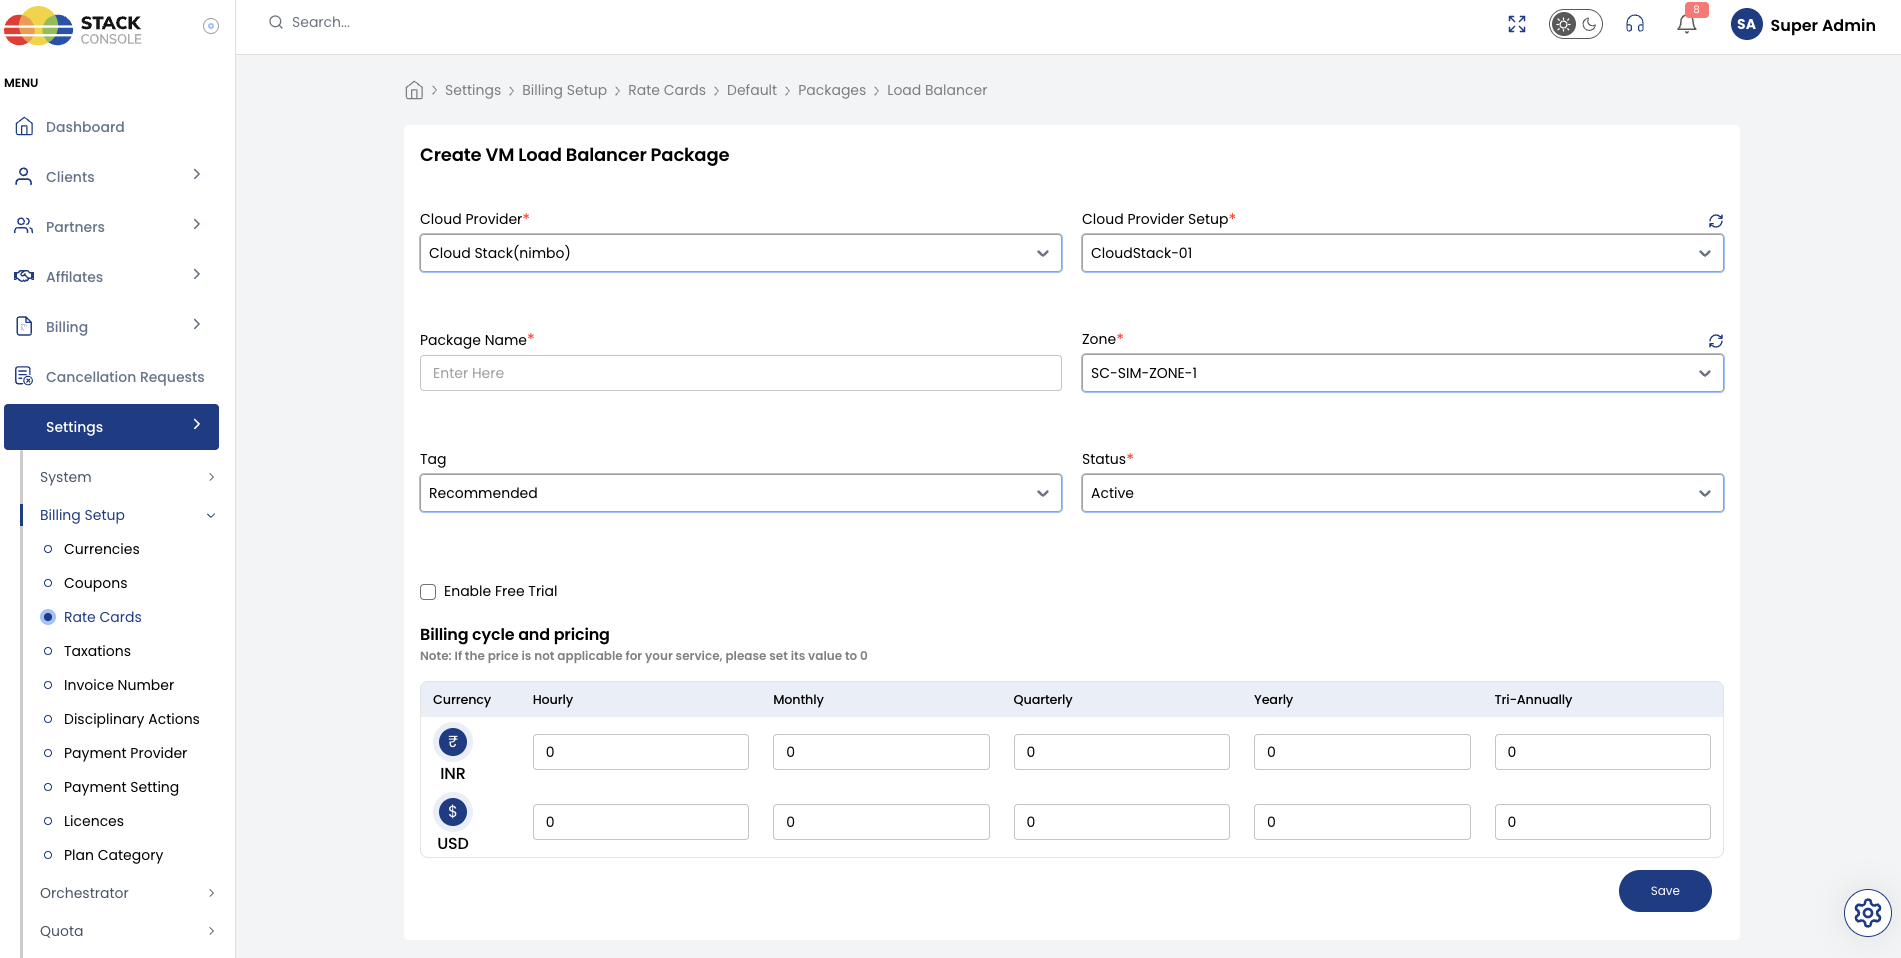
Each field below matches the Create VM Load Balancer Package form.
Cloud Provider
Required. Select the orchestrator type — for example, CloudStack (Nimbo).
Cloud Provider Setup
Required. Select the CloudStack instance this package belongs to — for example, CloudStack-01.
CMP supports one load balancer package per Cloud Provider Setup + Zone. Create separate entries if you operate multiple setups or zones.
Package Name
Required. Display name for the load balancer service — for example, Standard Load Balancer or VM Load Balancer.
Zone
Required. Select the CMP zone where this load balancer package applies. Load balancer billing is scoped to the zone where the customer's network and VMs reside.
Tag
Optional. Assign a tag for filtering or promotional labelling in the customer portal — for example, Recommended.
Tags are CMP-level labels used for representation only. They do not map to CloudStack host or storage tags.
Status
Required. Controls package visibility.
| Status | Behaviour |
|---|---|
| Active | Load balancer pricing applies when customers create LB rules in this zone |
| Inactive | Hidden — use while configuring pricing or testing |
Enable Free Trial
Optional. When enabled, customers can create load balancers under this package within a free-trial policy without immediate billing for the trial period.
Billing cycle and pricing
Required. Set the price for each billing cycle and currency CMP supports.
Load balancer billing in CMP is typically a flat recurring charge per load balancer rule, depending on your rate card design. Enter pricing for each billing cycle you offer.
Define the monthly price first, then derive hourly using Monthly ÷ (30.5 × 24). See Pricing Formulas.
When pricing Kubernetes or bundled services, note that CMP does not charge for the Kubernetes default load balancer by default — configure LB pricing only if you intend to bill for it separately.
End-to-end example
Goal: Charge for load balancer rules in zone SC-SIM-ZONE-1.
CloudStack
- Confirm VPC offering
Premium-VPCincludes Load Balancer service - Verify VirtualRouter LB provider is active on the zone's physical network
CMP
- Enable Load Balancer service in Cloud Provider Setup (Wizard Step 1)
- Open Packages → Load Balancer → Add Package
- Set Cloud Provider CloudStack (Nimbo), Cloud Provider Setup
CloudStack-01, Package NameStandard Load Balancer, ZoneSC-SIM-ZONE-1 - Set Tag to Recommended if desired
- Enter monthly and hourly pricing
- Set Status to Active and save
Customers create and manage load balancers from the dedicated Load Balancer service page in the CMP portal. For VPC workloads, advise customers to use a separately acquired public IP — not the VPC Source NAT address — because CloudStack rejects load balancer rules on Source NAT IPs.
Customer portal view
All load balancer creation and management happens in the Load Balancer service section. CMP does not expose load balancer actions on the Network or IP Address detail pages.
During load balancer creation, customers select a public IP from the options shown in CMP. CMP does not validate IP eligibility for load balancing against CloudStack rules.
Validation checklist
Before marking a Load Balancer package Active, verify:
- Load Balancer service is enabled in Cloud Provider Setup (Wizard Step 1)
- CloudStack network or VPC offerings in the zone include the Load Balancer service
- Virtual router system service offerings are sized for expected LB traffic
- Pricing is configured for each supported currency and billing cycle
- Global quotas allow sufficient Load Balancer count per account