Connecting CMP to CloudStack
This guide walks through the complete process of connecting CMP to an Apache CloudStack (ACS) instance — covering both the CloudStack side (creating the required domain, account, user, and API keys) and the CMP side (a 7-step Cloud Provider setup wizard).
- CloudStack is installed and its API endpoint is reachable from the CMP server
- You have ROOT admin access to CloudStack
- CMP is installed and you are logged in as Super Admin
Overview
CMP communicates with CloudStack using a DomainAdmin API key and secret.
- For new customer account creation, CMP uses the parent domain credentials only during the initial provisioning process to create the customer domain, account, and API credentials.
- For all subsequent customer-triggered operations, after account creation, all API requests are performed using the customer account's own credentials, ensuring access is restricted to that account and its authorized resources only.
CMP  ──── DomainAdmin API Key/Secret ────▶  CloudStack (CMP-PROD Domain)
                                                └── Customer Domains (auto-created)
Part 1 — CloudStack Setup
Before adding a Cloud Provider in CMP, you must prepare the following in CloudStack:
- A dedicated subdomain for CMP (e.g.
CMP-PROD) - An account with the DomainAdmin role inside that subdomain
- A user inside that account
- API Key and Secret generated for that user
Step 1 — Log in to CloudStack as Root Admin
Open your CloudStack management URL and log in with ROOT admin credentials.
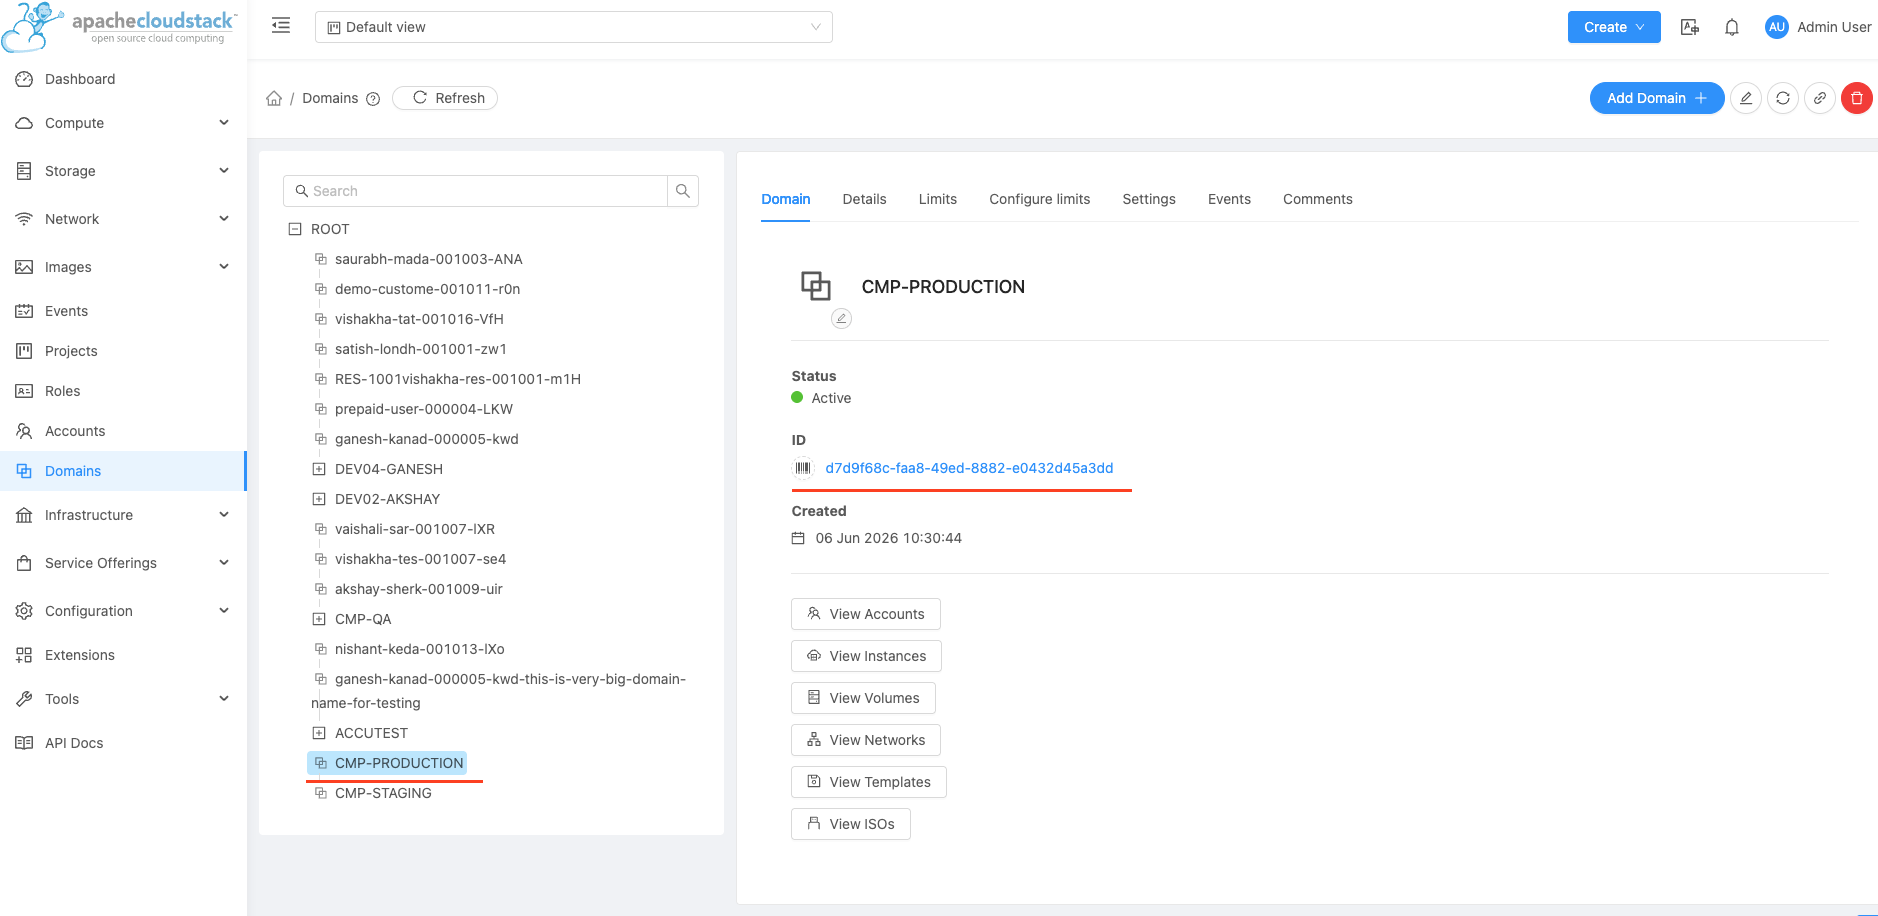
Step 2 — Create a subdomain for CMP
- Navigate to Domain in the left sidebar
- Select the ROOT domain
- Click Add Sub-domain
- Enter a name — e.g.
CMP-PROD(this is the parent domain CMP will manage) - Click OK
Use a clear name like CMP-PROD or CMP-[YourBrandName]. All customer
domains created by CMP will live under this subdomain.
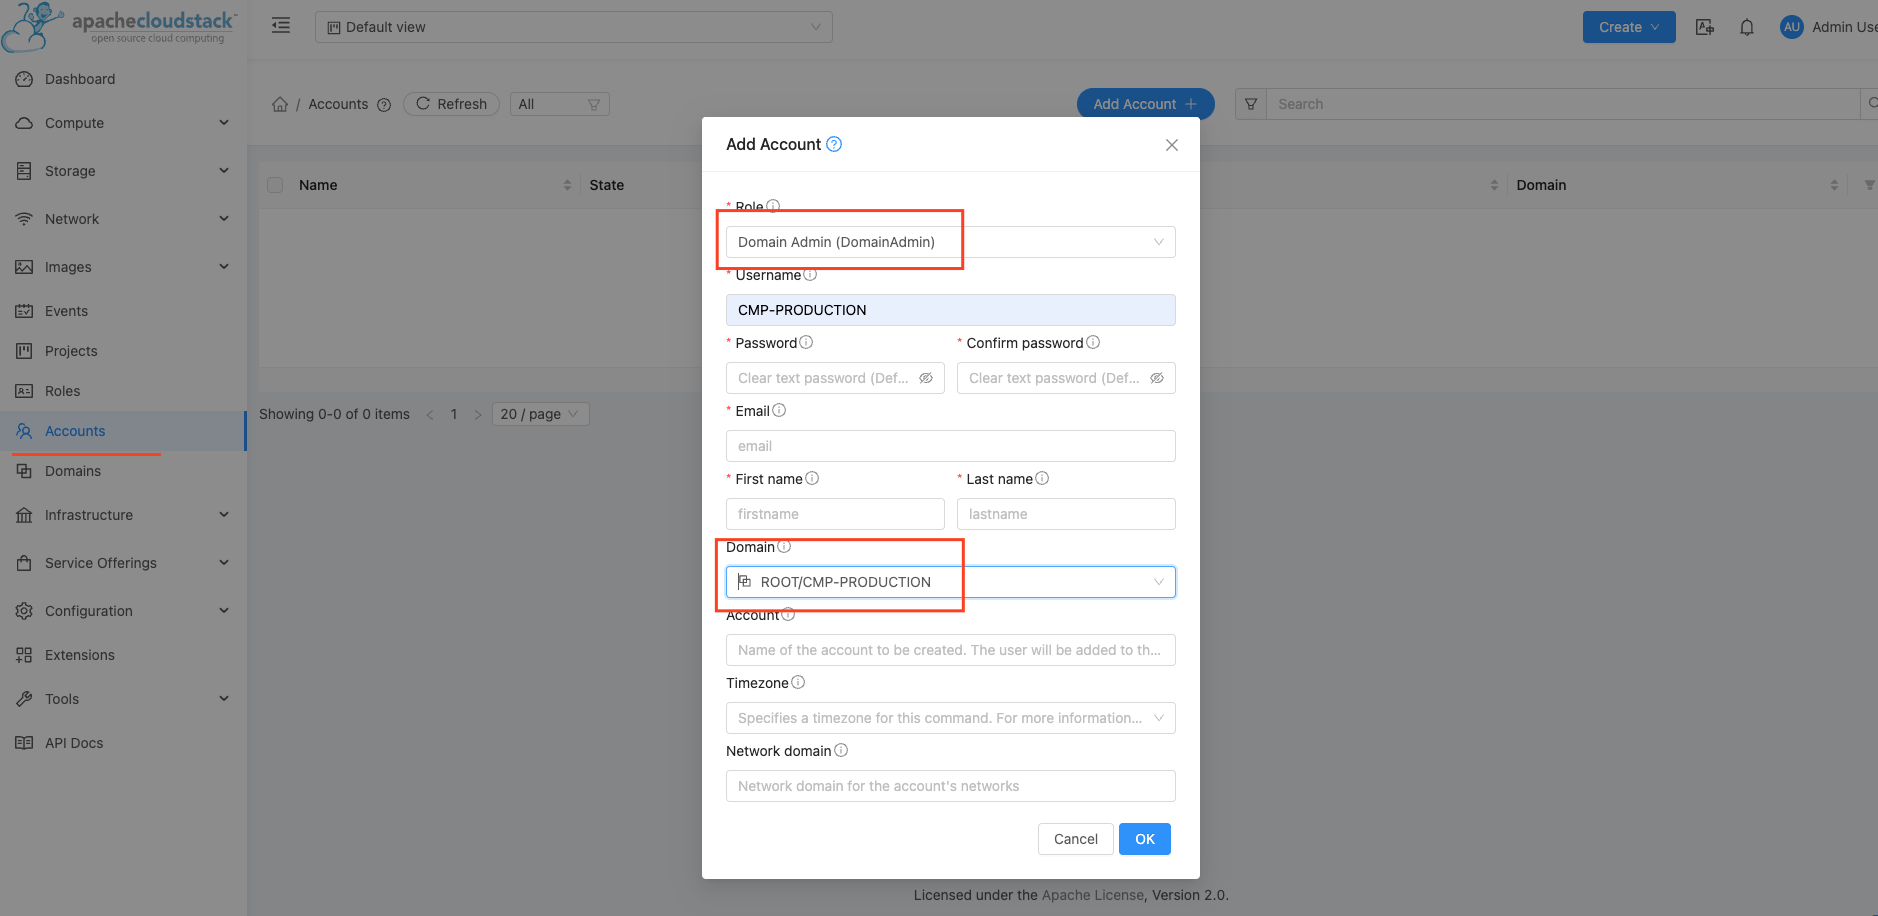
Step 3 — Create a DomainAdmin account inside the subdomain
- Navigate to Accounts in the left sidebar
- Click Add Account
- Fill in the form:
| Field | Value |
|---|---|
| Username | e.g. cmp-admin |
| Password | Set a strong password |
| Admin contact email | |
| First Name / Last Name | As required |
| Domain | Select the CMP-PROD domain you just created |
| Role | Select Domain Admin |
- Click OK
ROOT credentials are not required and not recommended. A DomainAdmin scoped to the CMP-PROD domain provides all capabilities CMP needs while following the principle of least privilege. ROOT credentials are reserved for future roadmap features.
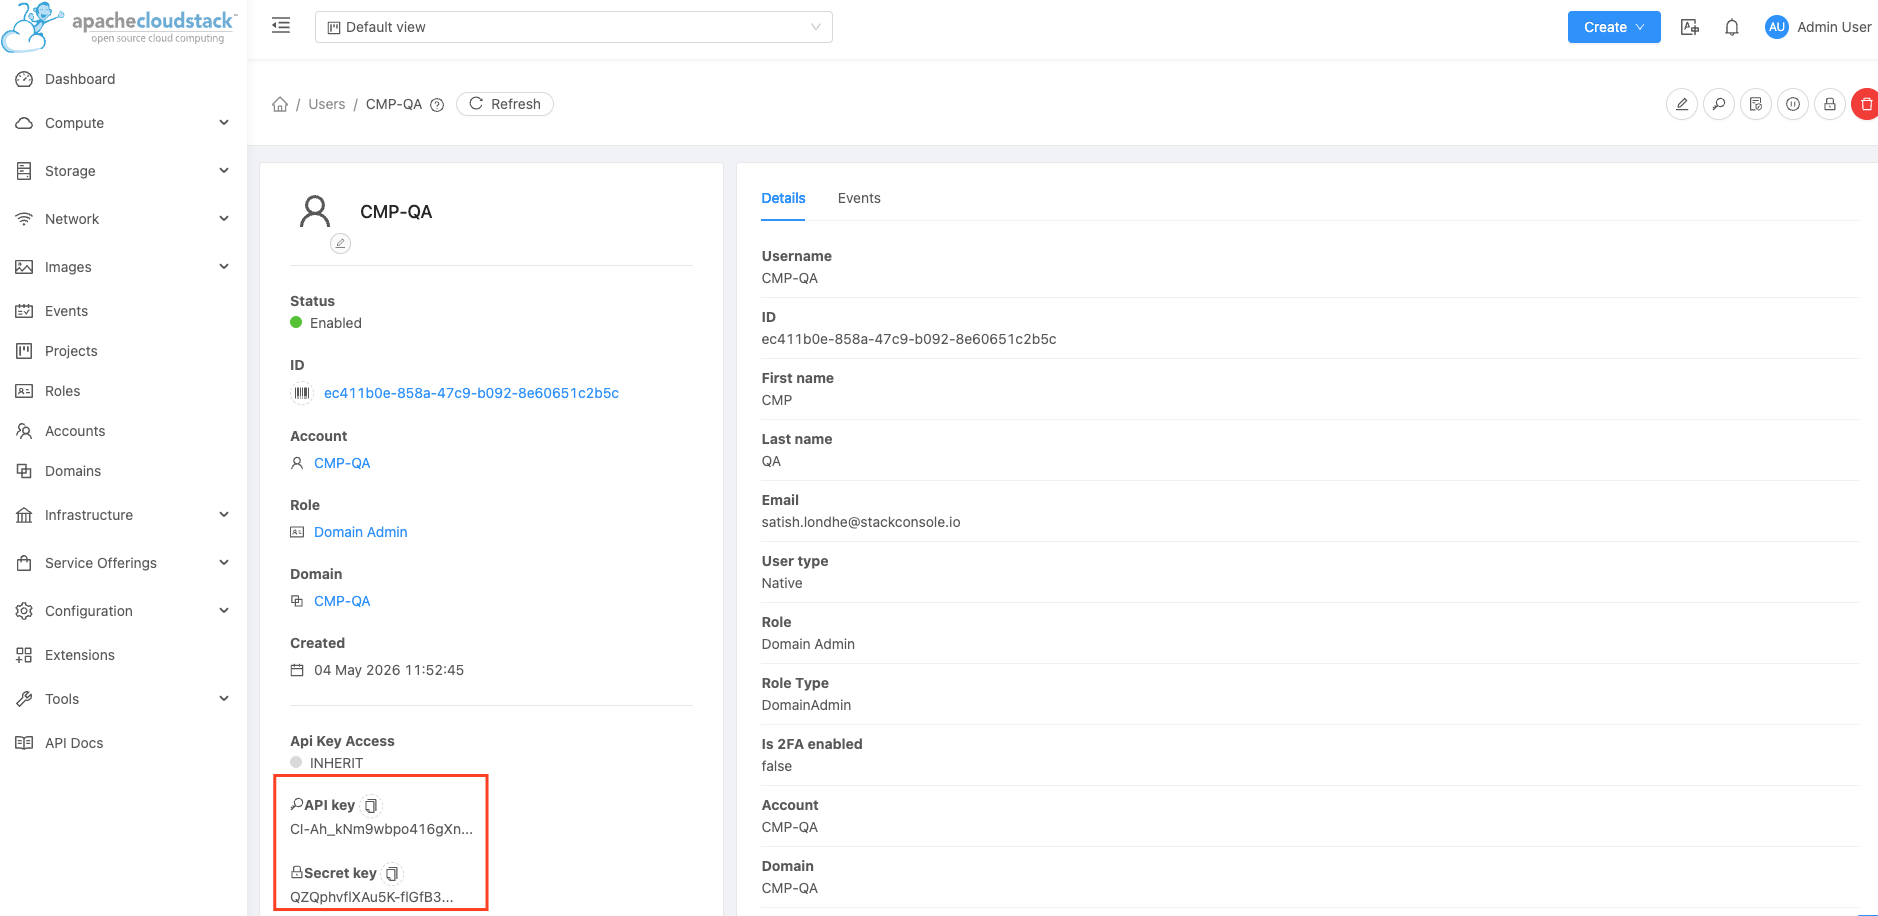
Step 4 — Locate the user inside the DomainAdmin account
CloudStack automatically creates a user when the account is created.
- Click into the account you just created
- Go to the Users tab to see the auto-created user
Step 5 — Generate API Key and Secret for the user
- Click on the user
- Click Generate Keys (key icon in the action buttons, top right)
- Copy and securely save both values:
- API Key
- Secret Key
The Secret Key is only shown once. Store it in a password manager or secrets vault before leaving this screen.
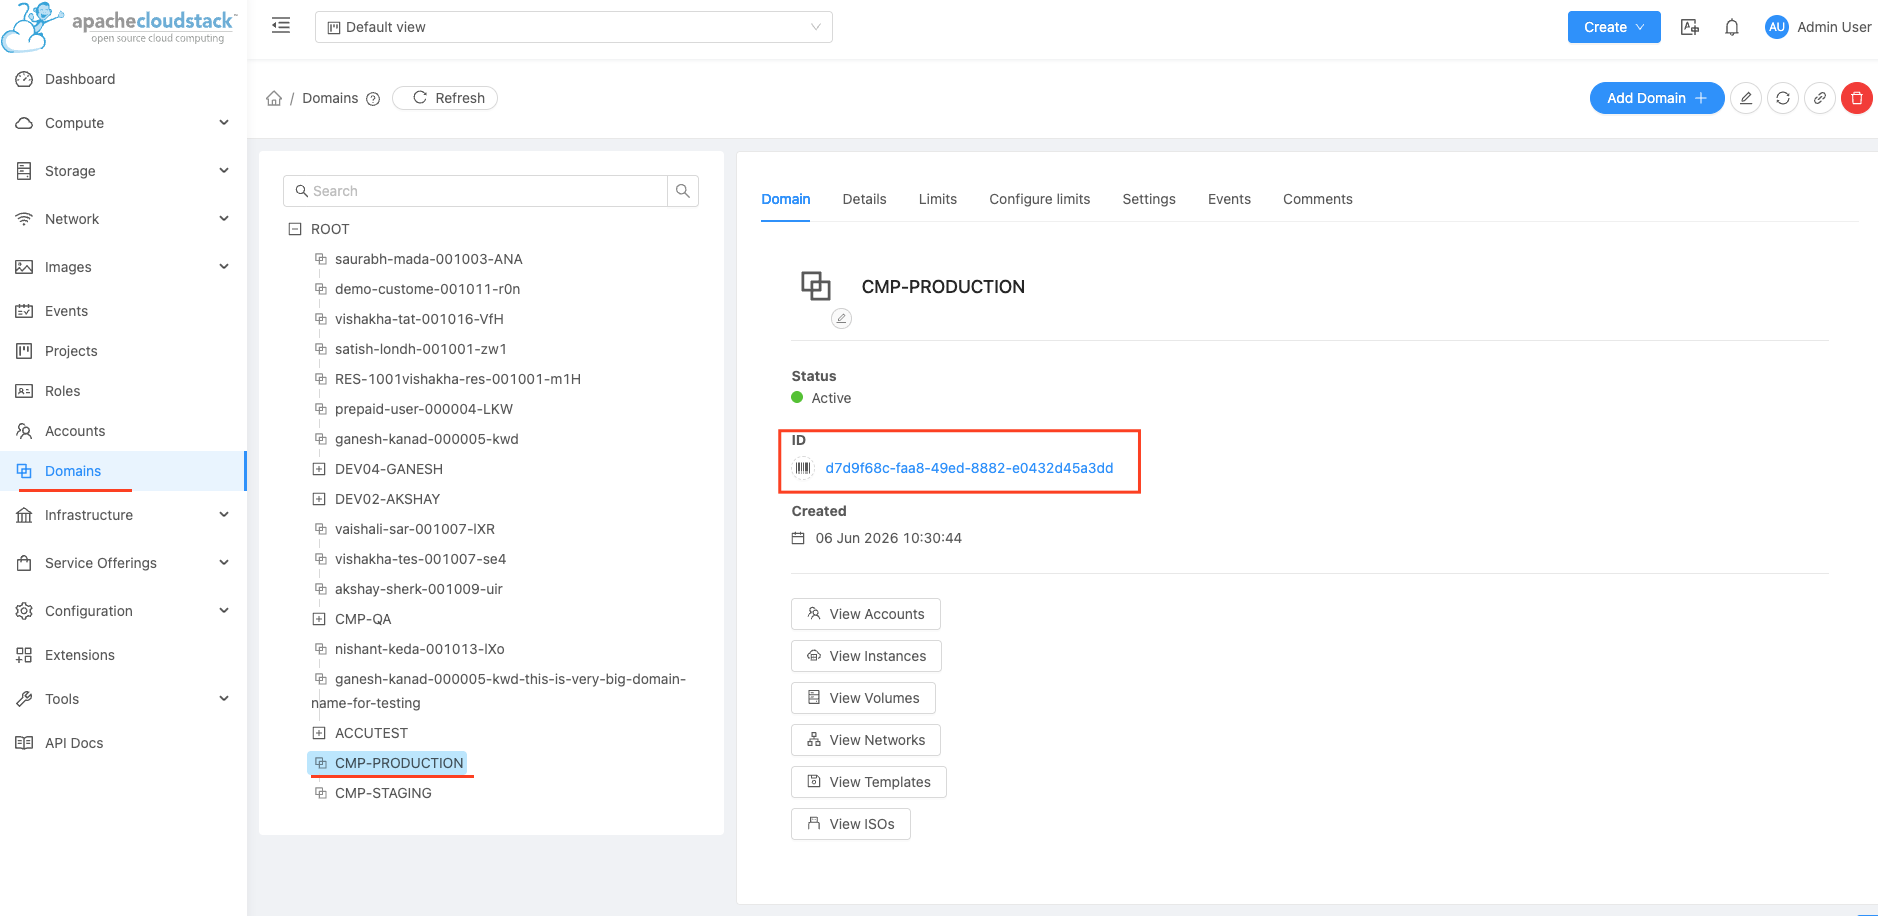
Step 6 — Find the Parent Domain ID
- Navigate to Domains in the left sidebar
- Click on your
CMP-PRODdomain - The Domain ID (UUID) is shown in the detail panel
Copy this UUID — you will need it in CMP Step 1 below.
Part 2 — CMP Setup (7-step wizard)
Navigate to Settings → Orchestrator → Cloud Provider Setup and click Add Cloud Provider. This opens a 7-step wizard.
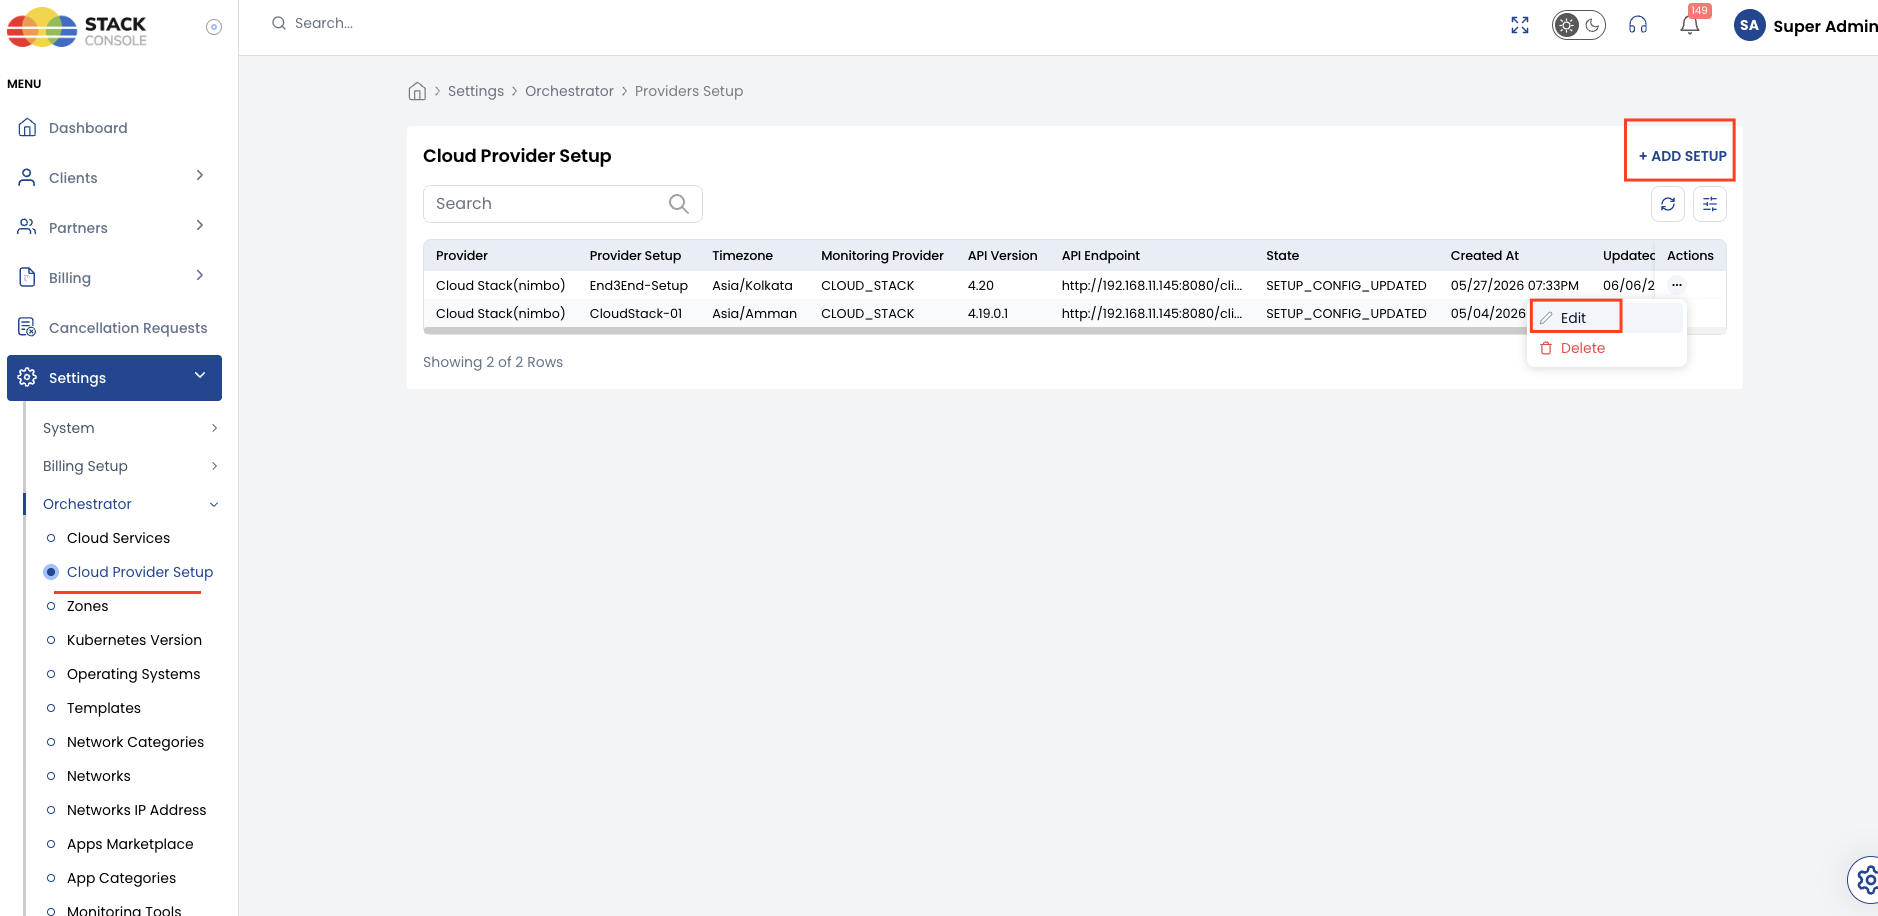
Wizard Step 1 — Provider Setup
This step establishes the core connection between CMP and your CloudStack instance.
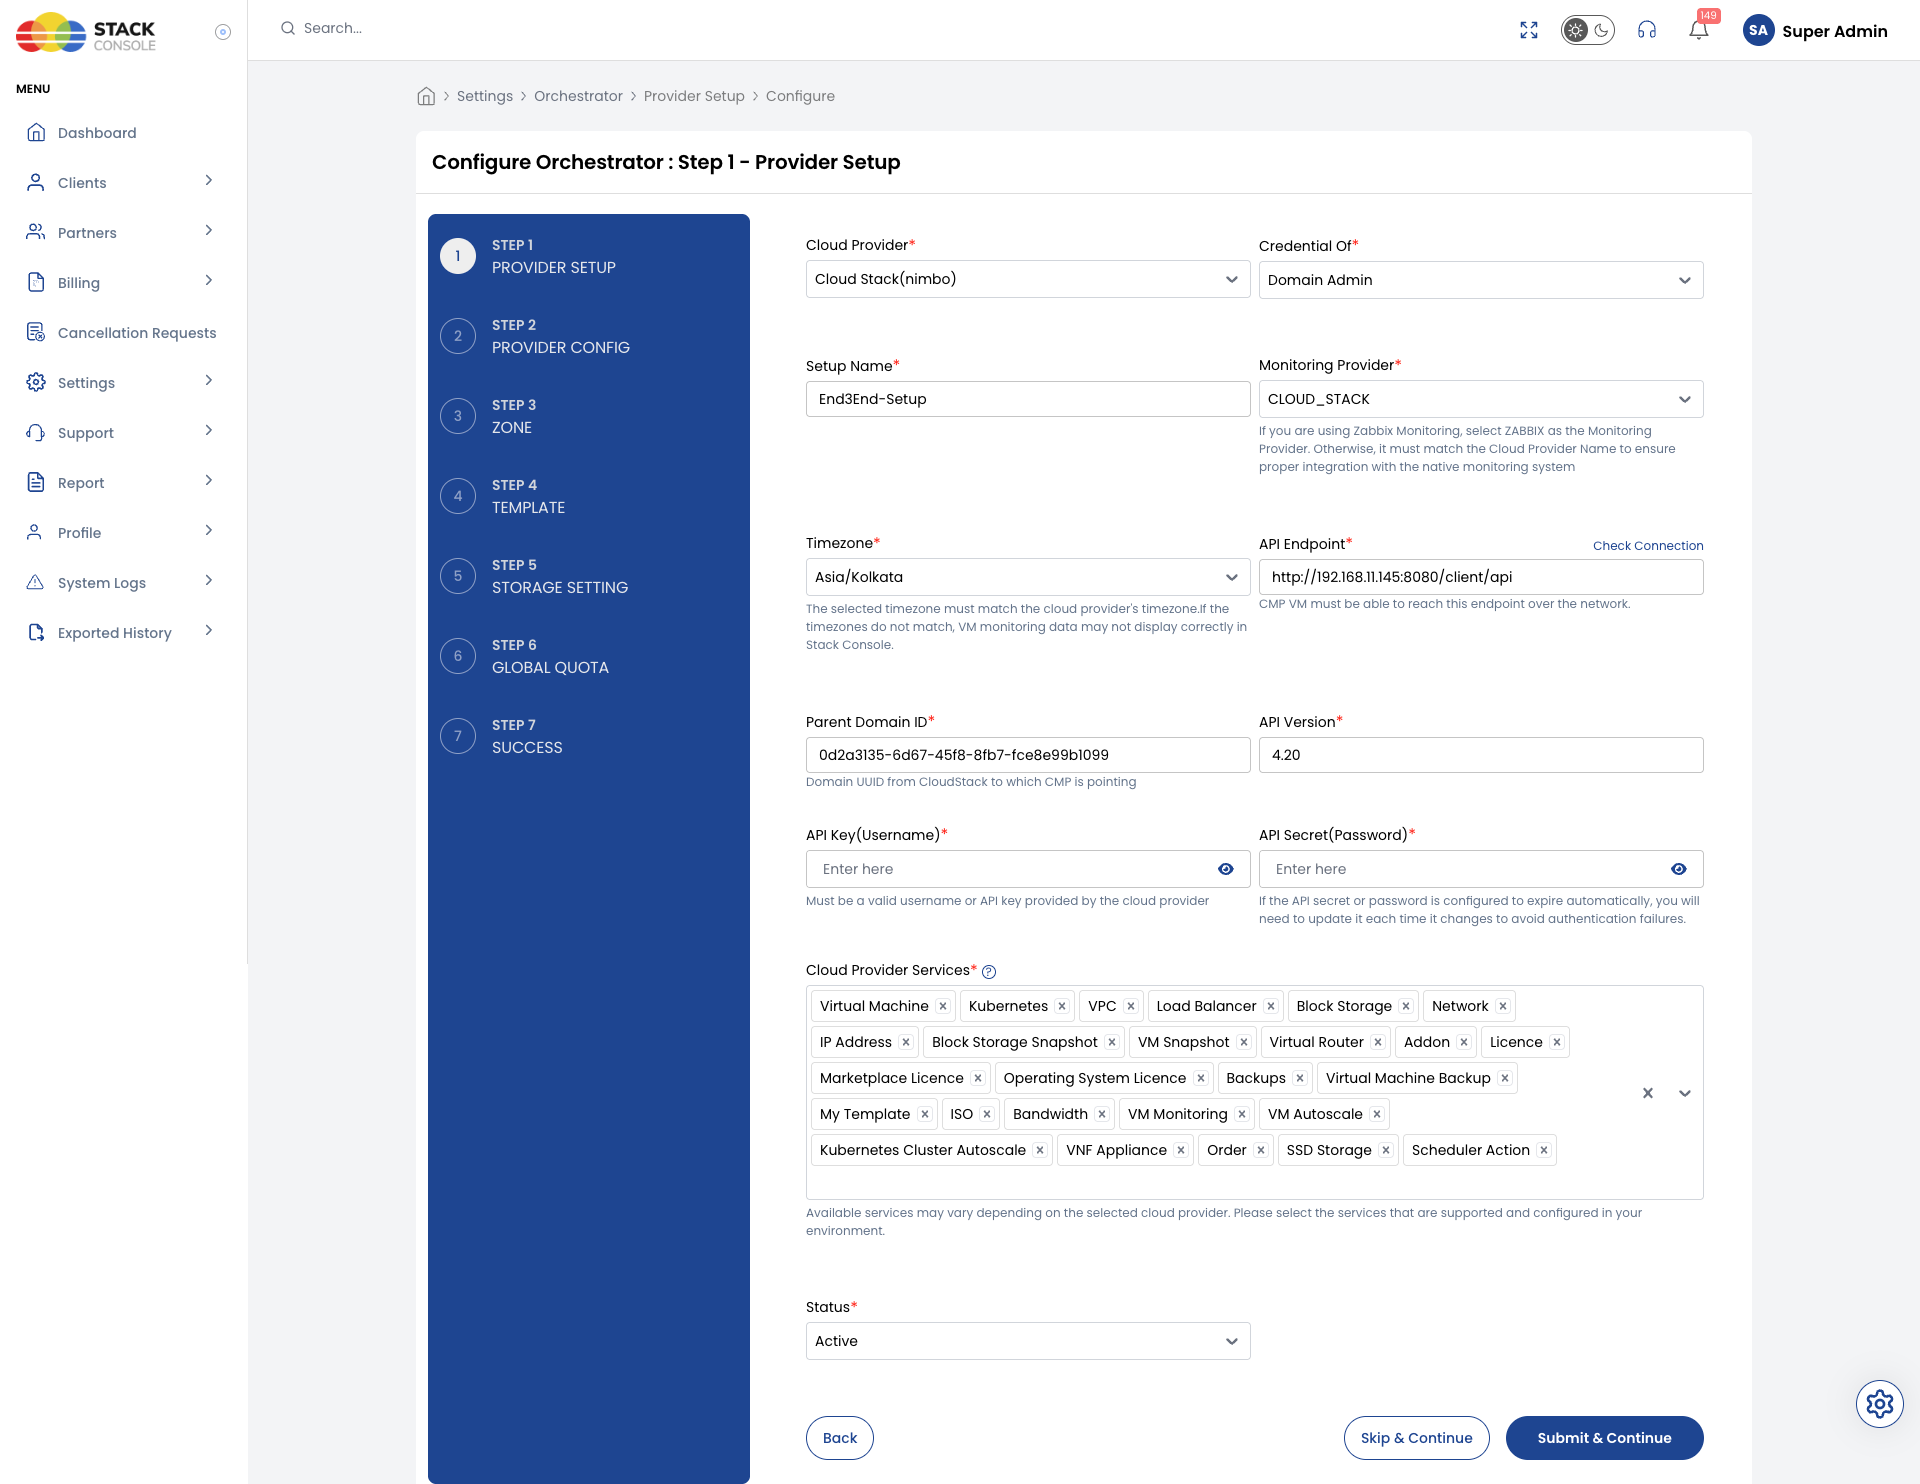
| Field | Example Value | Description |
|---|---|---|
| Cloud Provider | CloudStack (Nimbo) | Select CloudStack. It may appear as Nimbo in the dropdown — this is the internal alias; they are the same. |
| Credential Of | Domain Admin | Always select Domain Admin. ROOT is reserved for future roadmap features. |
| Setup Name | End3End-Setup | A unique name to identify this Cloud Provider setup within CMP. Used to distinguish between multiple setups. |
| Monitoring Provider | CLOUD_STACK | ZABBIX Is for old CloudStack setups, from CloudStack 4.20 CMP using CloudStack native monitoring. To setup CloudSatck 4.20+ select CLOUD_STACK to use CloudStack's native monitoring. |
| Timezone | Asia/Kolkata | Must exactly match the timezone configured on the CloudStack management server. If mismatched, VM monitoring data and usage statistics will not display correctly in CMP. |
| API Endpoint | http://192.168.11.1:8080/client/api | The CloudStack API URL. The CMP VM must be able to reach this endpoint over the network. Use the Check Connection button to verify reachability before proceeding. |
| Parent Domain ID | 12121212-121-4233-8fb7-fce8e99b1099 | The UUID of the domain in CloudStack which acts as parent for all customer domains, accounts, and users created by CMP will live under this domain. |
| API Version | 4.20 | The CloudStack API version running on your management server. |
| API Key (Username) | (from CloudStack user) | The API Key generated for the DomainAdmin user in Part 1, Step 5. |
| API Secret (Password) | (from CloudStack user) | The Secret Key paired with the API Key above. |
| Status | Active | Set to Active to enable this Cloud Provider immediately. Set to Inactive to configure it without making it live. |
After filling in the API Endpoint, API Key, and API Secret, click the Check Connection button to verify CMP can reach CloudStack before proceeding. This saves time debugging connection issues later.
Cloud Provider Services
Select the services that are supported and configured in your CloudStack environment. Only enabled services are visible to customers in CMP.
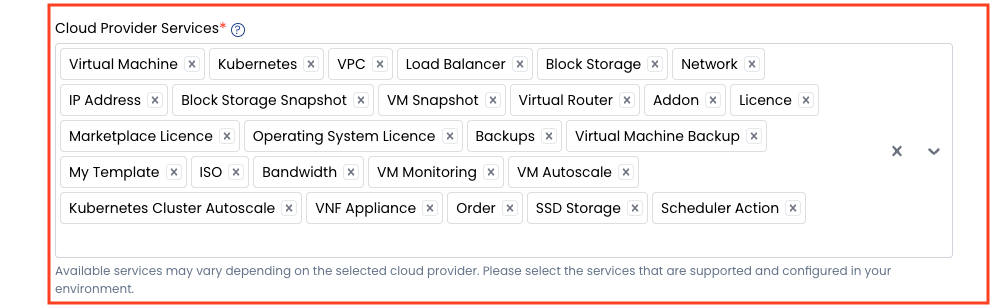
| Service | Description |
|---|---|
| Virtual Machine | Core VM provisioning — enable if CloudStack compute zones are configured |
| Kubernetes | Container cluster management via CloudStack Kubernetes Service (CKS) |
| VPC/Virtual Router | Virtual Private Cloud networking with isolated network environments |
| Load Balancer | Network-level load balancing via CloudStack LB service providers |
| Block Storage | Additional data volumes using CloudStack disk offerings |
| Network | Shared/isolated network management |
| IP Address | Public IP address allocation and management |
| Block Storage Snapshot | Point-in-time snapshots of data volumes |
| VM Snapshot | Full instance snapshots (requires kvm.snapshot.enabled = true in CloudStack) |
| Backups → Virtual Machine Backup | Automated VM backup (CMP built-in[Automated snapshot as backup] or CloudStack native backup) |
| My Template | Customer-created templates from existing VM instances |
| ISO | ISO image management for VM provisioning |
| Bandwidth | Network-level bandwidth usage billing |
| VM Monitoring | Usage only CloudStack monitoring data for view only, CMP dose not support any actions to configure on this data as of now |
| VM Autoscale | Automatic VM scaling based on load thresholds |
| Kubernetes Cluster Autoscale | Automatic node scaling for Kubernetes clusters |
| VNF Appliance | Virtual Network Function appliance provisioning |
| SSD, NVMe, HDD Storage | Block storage, see storage settings sections for more details. CMP will not allow you to add this service if this storage settings are not configired first. |
| Scheduler Action | Scheduled start/stop/reboot actions for VMs |
| Addon / Licence | Marketplace and OS licence management |
| Order | Order management workflow integration |
Click Submit & Continue to proceed.
Wizard Step 2 — Provider Config
Advanced configuration for CloudStack-specific behaviour in CMP.
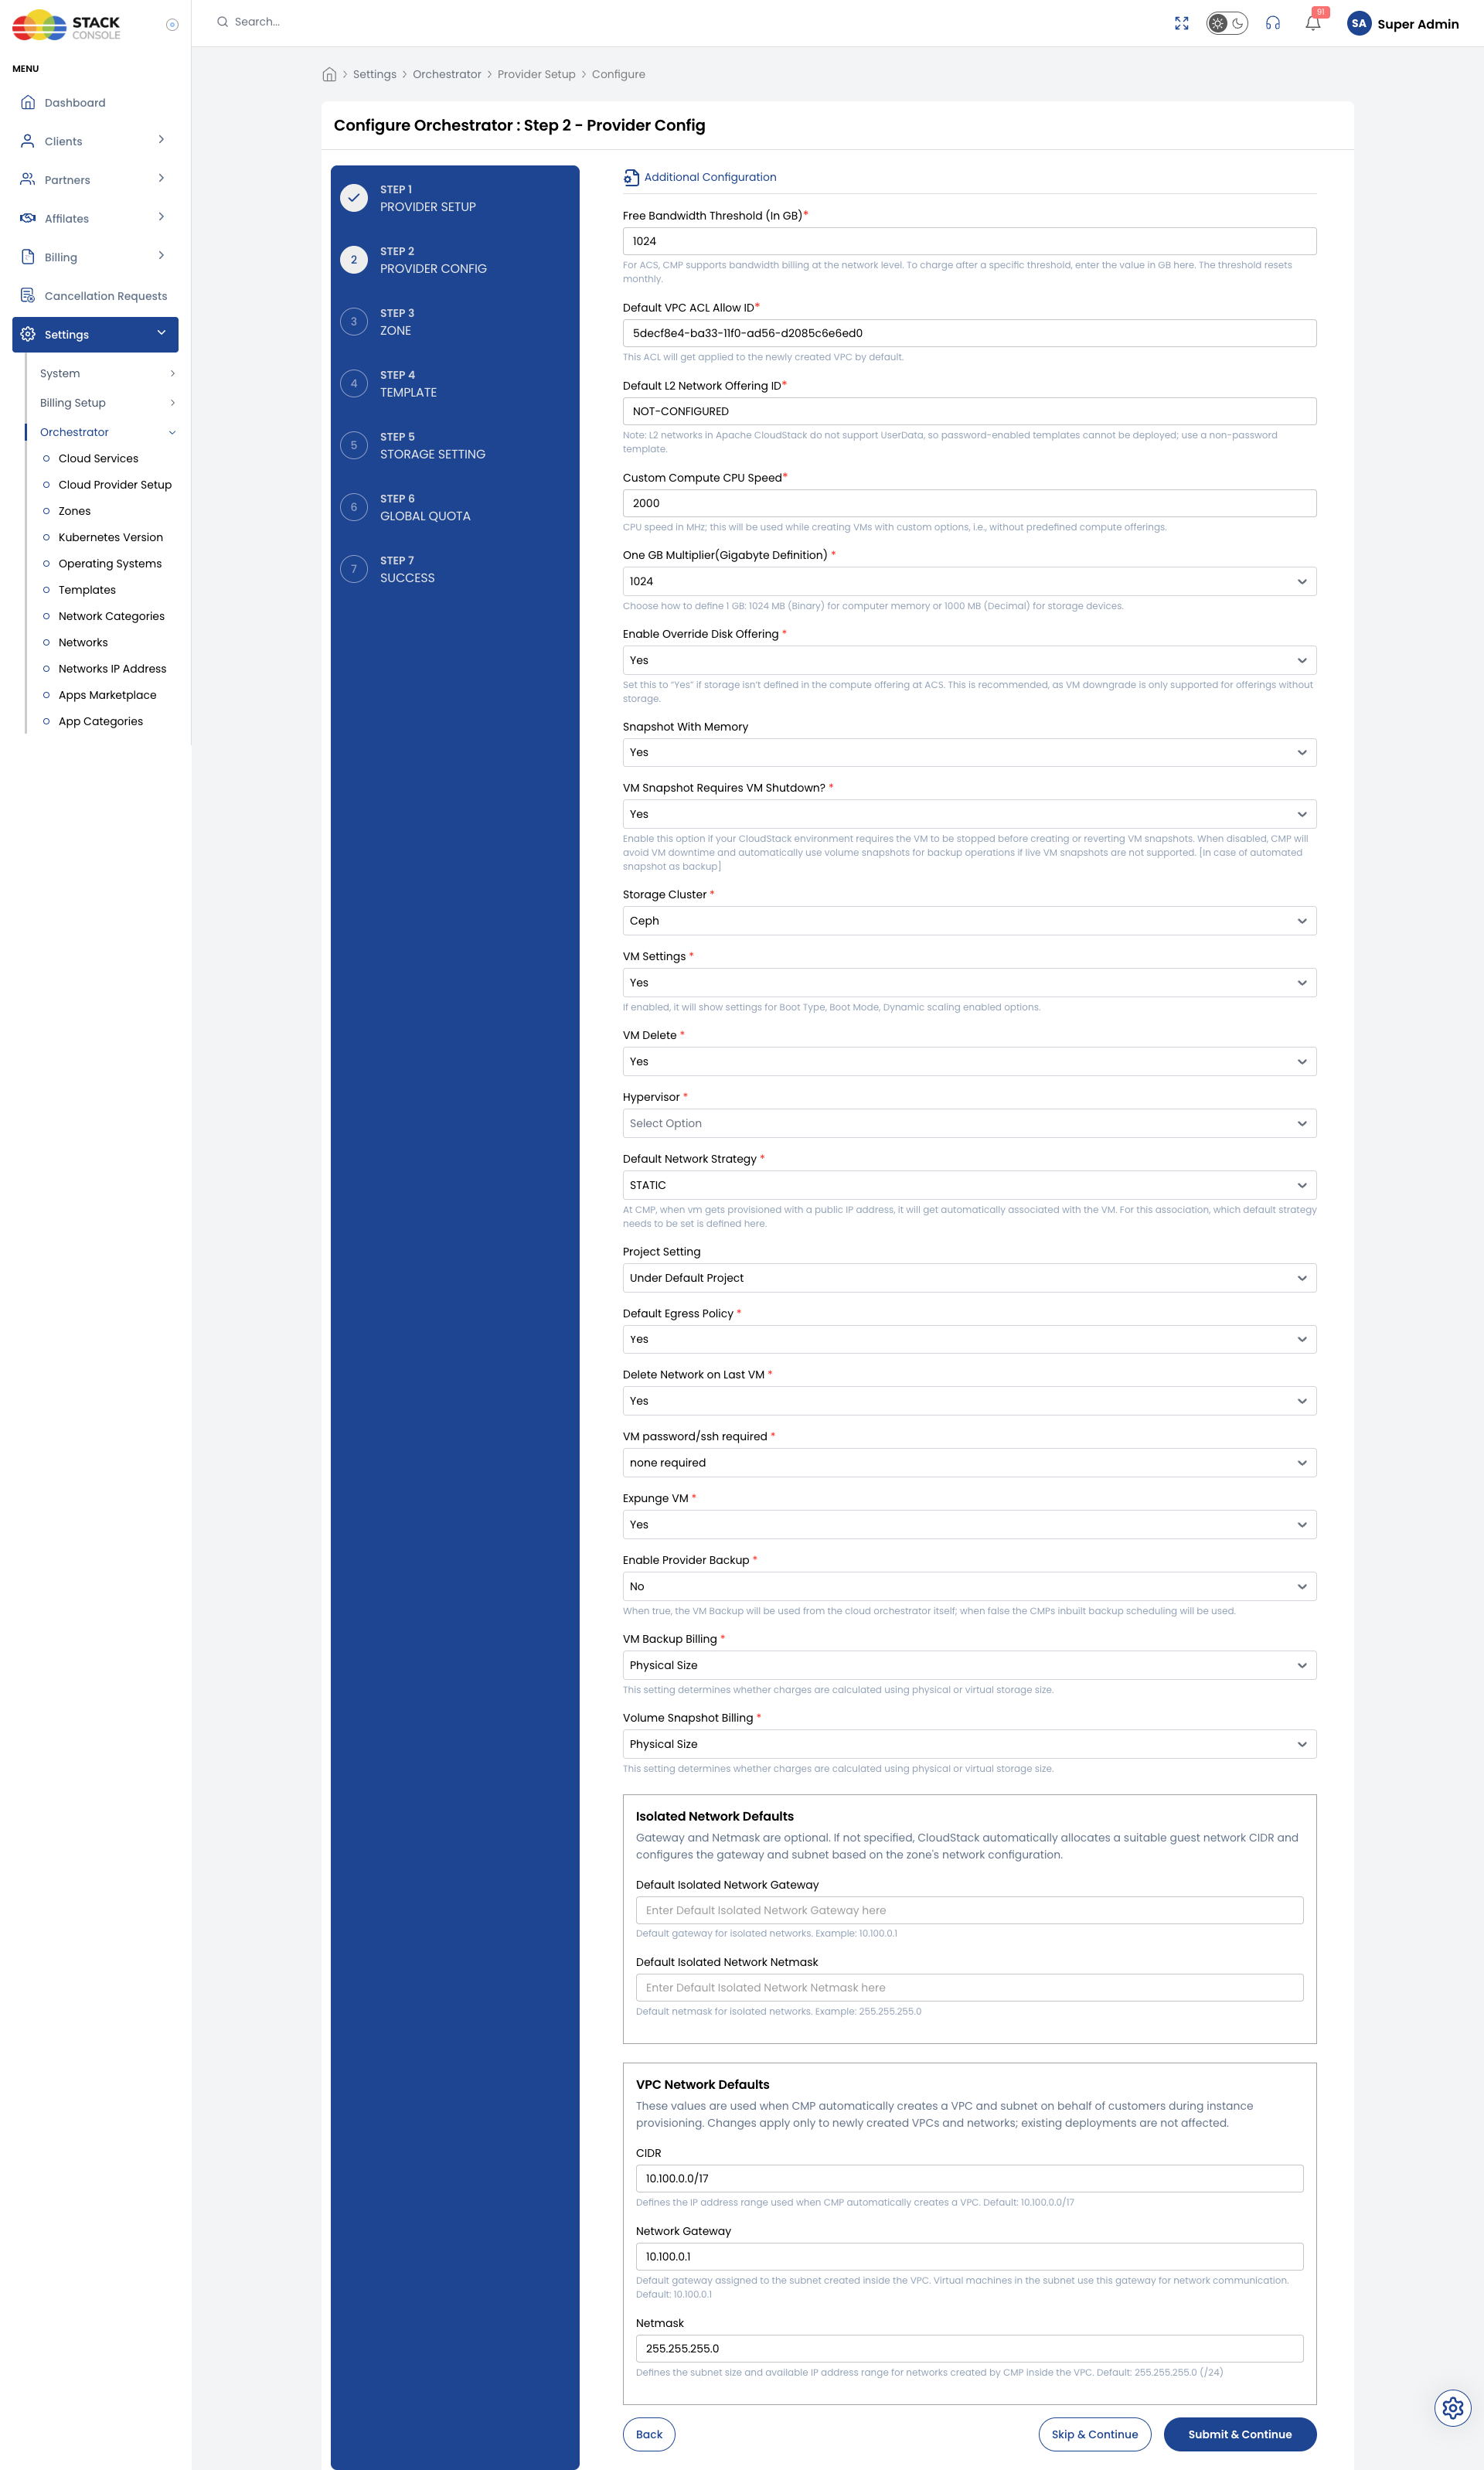
| Field | Default | Description |
|---|---|---|
| Free Bandwidth Threshold (GB) | 0 | Monthly free bandwidth allowance per account before billing starts. Set to 0 to charge from the first GB. The usage counter resets to zero every month. |
| Default VPC ACL Allow ID | (UUID) | The CloudStack ACL ID that gets applied to every new VPC created via CMP. Obtain this UUID from CloudStack → Network → VPC → ACL Lists. |
| Default L2 Network Offering ID | NA | The CloudStack network offering ID to use for L2 networks. Set to NA if L2 networks are not used. In new CMP version this option is available in rate card, network packages. |
| Custom Compute CPU Speed | 2000 | CPU speed in MHz used when provisioning VMs with custom (non-predefined) compute offerings. Must match a valid CPU speed available in your CloudStack compute offerings. |
| One GB Multiplier | 1024 | Defines how 1 GB is calculated: 1024 MB (binary, for memory) or 1000 MB (decimal, for storage). Match this to how your CloudStack reports storage. |
| Enable Override Disk Offering | No | Set to Yes if storage is not defined inside the compute offering in CloudStack (recommended). This enables customers to select root disk size at provisioning time and is required for VM downgrade support — downgrade is only supported for offerings without embedded storage. |
| VM Snapshot | Yes | Enables VM/instance snapshots. KVM supports instance snapshots on NFS shared storage only. If using Ceph (raw block storage), RAM memory cannot be written, so instance snapshots are not possible — disable this in that case. |
| Snapshot With Memory | No | If enabled, the snapshot captures the VM's CPU and memory state in addition to disk. This makes snapshots take longer but allows full state restoration. Only supported on NFS storage. |
| Stop VM on Snapshot | No | If enabled, CMP stops the VM before taking a snapshot and restarts it after. Use this if snapshots of running VMs are unreliable on your storage backend. |
| Storage Cluster | Ceph | The primary storage cluster type used in your CloudStack environment (e.g. Ceph, NFS). Used to determine snapshot capabilities. |
| VM Settings | Yes | If enabled, customers see advanced VM options at provisioning time: Boot Type, Boot Mode, and Dynamic Scaling. |
| VM Delete | Yes | If enabled, customers can delete their own VMs. Set to No to restrict deletion to admin-only. |
| Hypervisor | (select) | The hypervisor type in your CloudStack environment (KVM, VMware, XenServer). |
| Default Network Strategy | STATIC | How CMP attaches a public IP during Create Instance automation (create/reuse network → acquire IP → attach via API): Static NAT or Port Forwarding. Manual IP association afterward is chosen by the customer. See Public IP association. On isolated networks, the first (Source NAT) IP always uses Port Forwarding. |
| Project Setting | Under Project | Controls how CMP maps customers to CloudStack projects. |
| Default Egress Policy | Yes | If Yes, all outbound traffic from new networks is allowed by default. |
| Delete Network on Last VM | Yes | If Yes, CMP automatically deletes the network when the last VM in it is deleted. |
| VM Password/SSH Required | none required | Controls whether password or SSH key is required for VM provisioning. |
| Expunge VM | Yes | If Yes, deleted VMs are permanently expunged from CloudStack immediately. If No, they enter a recoverable deleted state. |
| Enable Provider Backup | No | When Yes, VM Backup uses the CloudStack native backup orchestrator (Veeam / NAS / Networker). When No, CMP's built-in scheduled snapshot system is used instead. See VM Backup and Snapshot & Backup for details. |
| VM Backup Billing | Virtual | Determines whether VM backup charges use physical (actual backup storage consumed) or virtual (provisioned disk) size. See Physical vs virtual size billing. |
L2 networks in Apache CloudStack do not support UserData, so password-enabled templates cannot be deployed on L2 networks. If L2 networks are in use, ensure non-password-enabled templates are available. See Template Requirements.
Click Submit & Continue to proceed.
Wizard Step 3 — Zone
This step shows the list of Zones configured for this Cloud Provider. At least one Zone must be added before customers can provision resources.
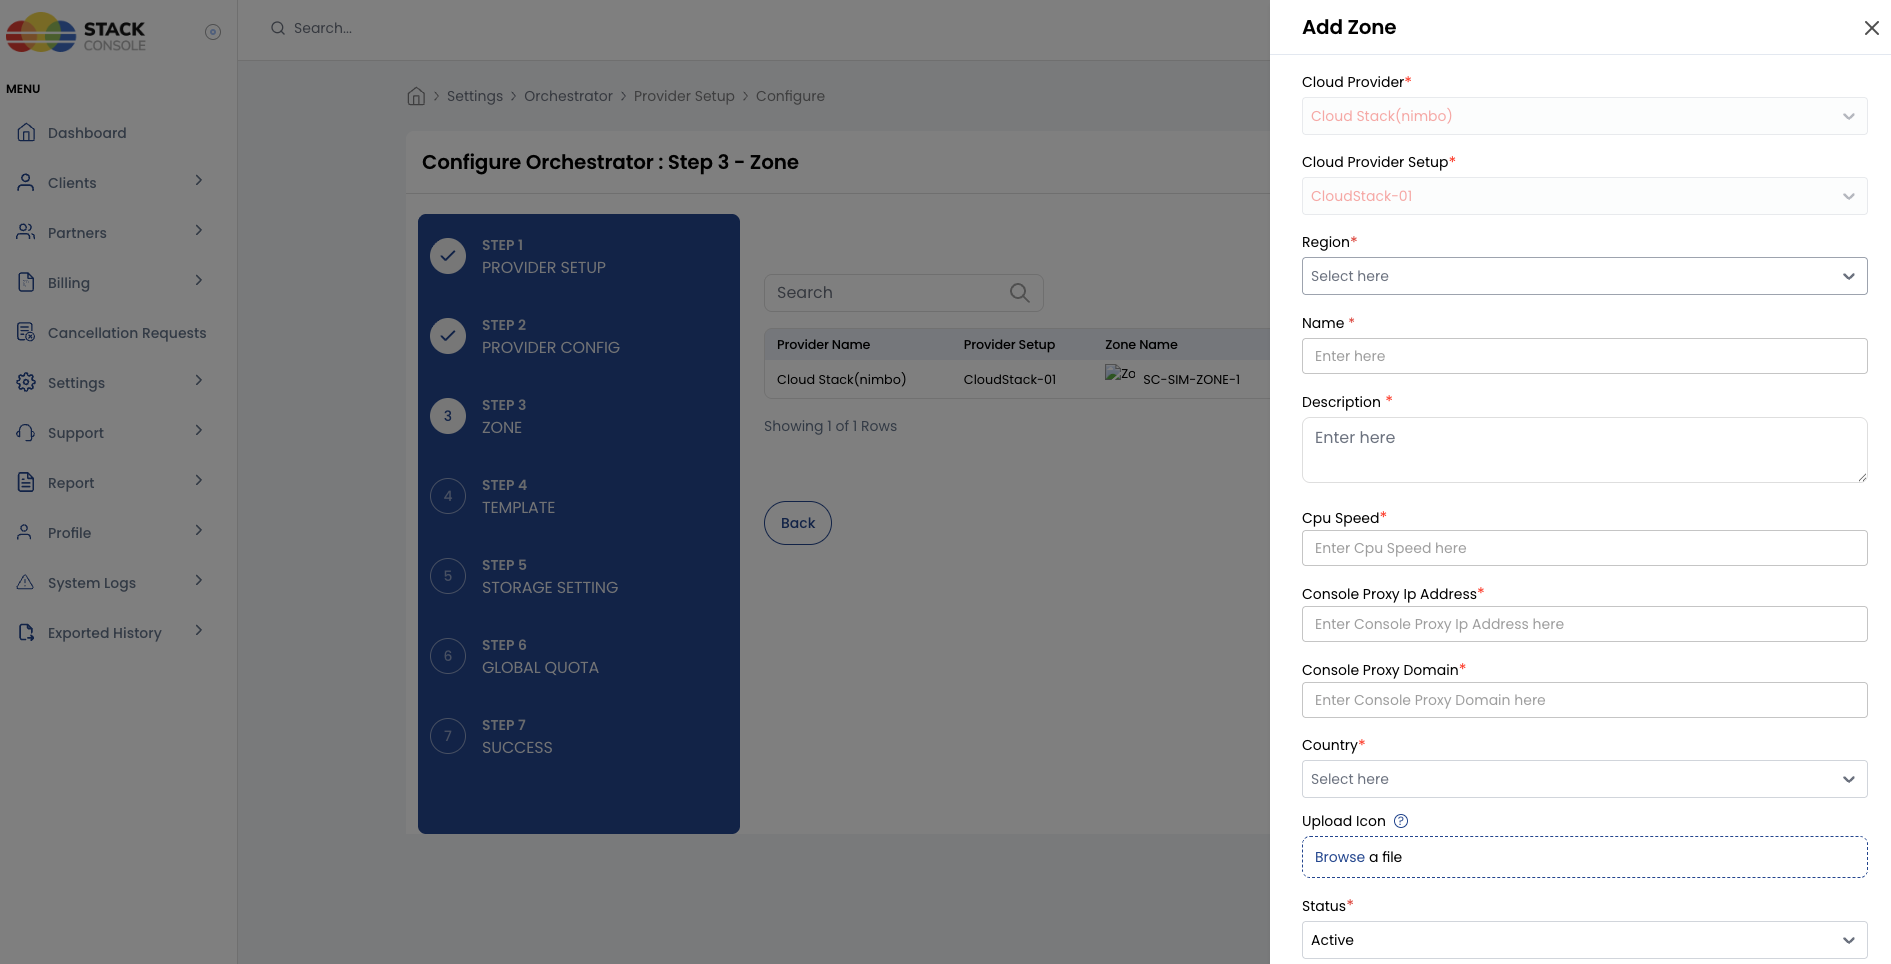
Zone configuration is covered in detail on a dedicated page. Click the link below to open it, then return here to continue the wizard.
Click Submit & Continue once your zones are added.
Wizard Step 4 — Template
This step shows the list of Templates available for this Cloud Provider. Templates define the operating system images used for VM provisioning.
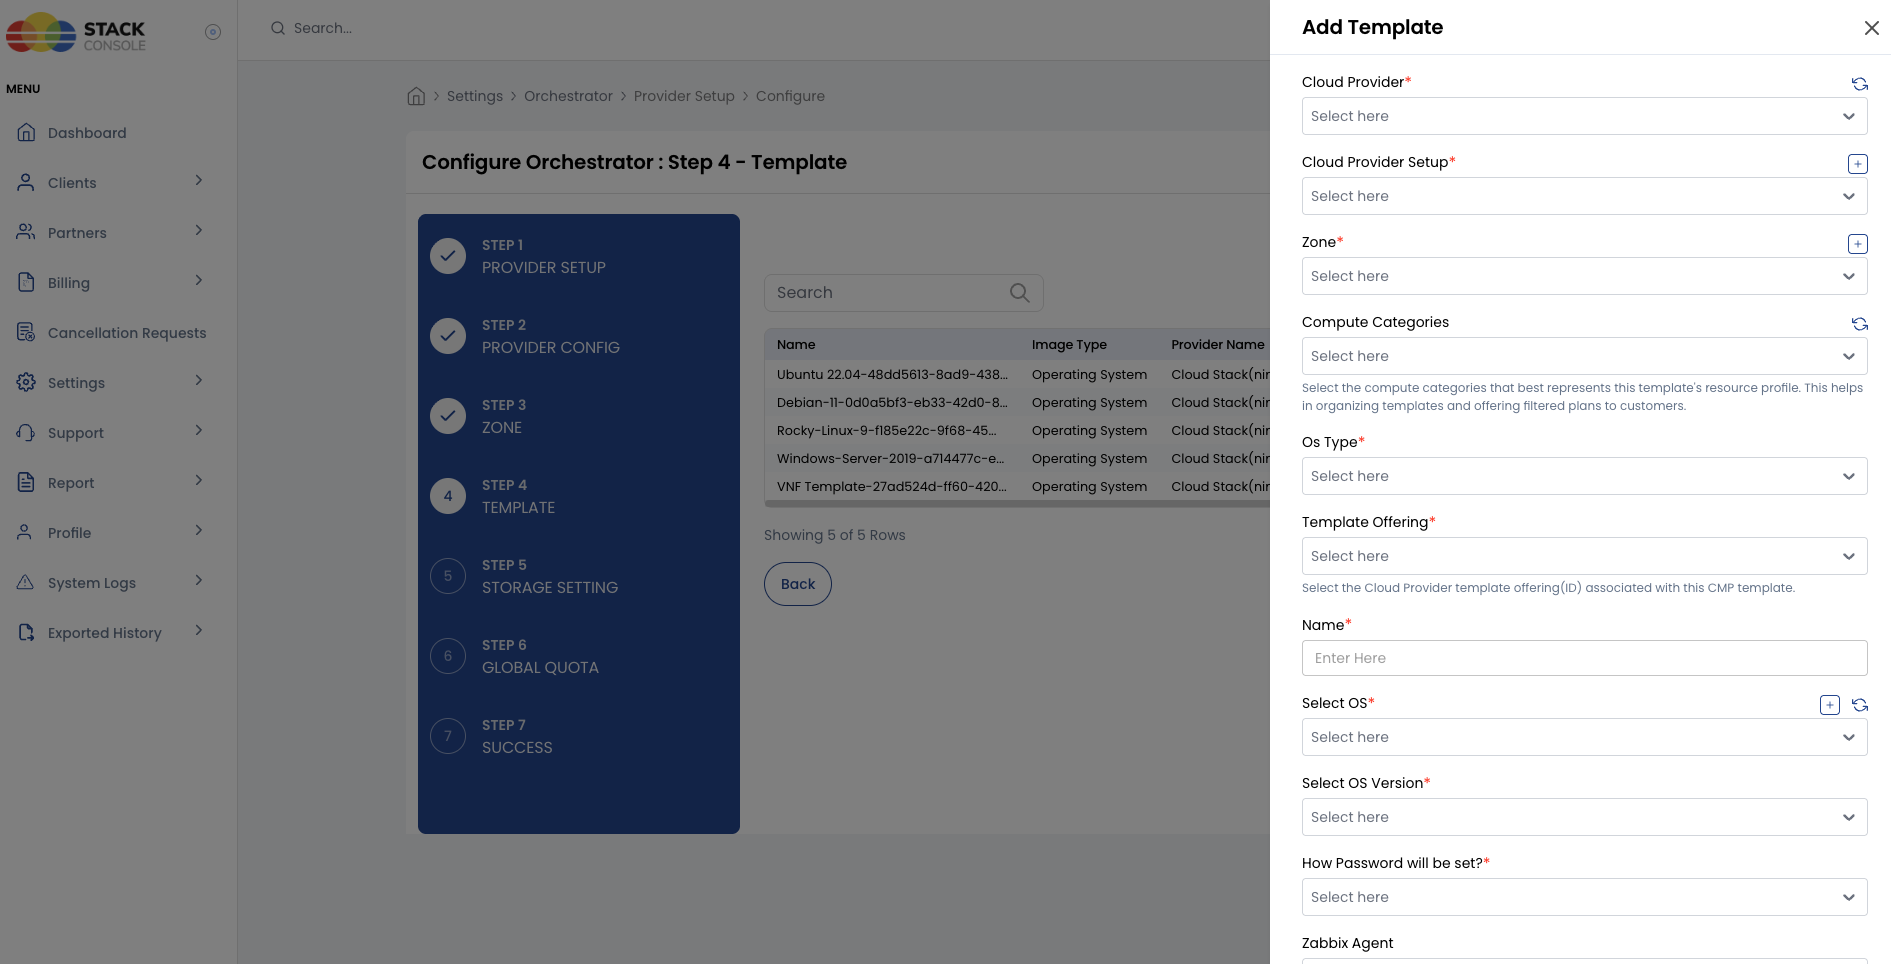
Template registration and requirements are covered on a dedicated page. Click the link below, then return here to continue the wizard.
Click Submit & Continue once your templates are configured.
Wizard Step 5 — Storage Settings
This step shows the Storage Settings associated with this Cloud Provider. Storage settings map CloudStack disk offerings to CMP storage categories.
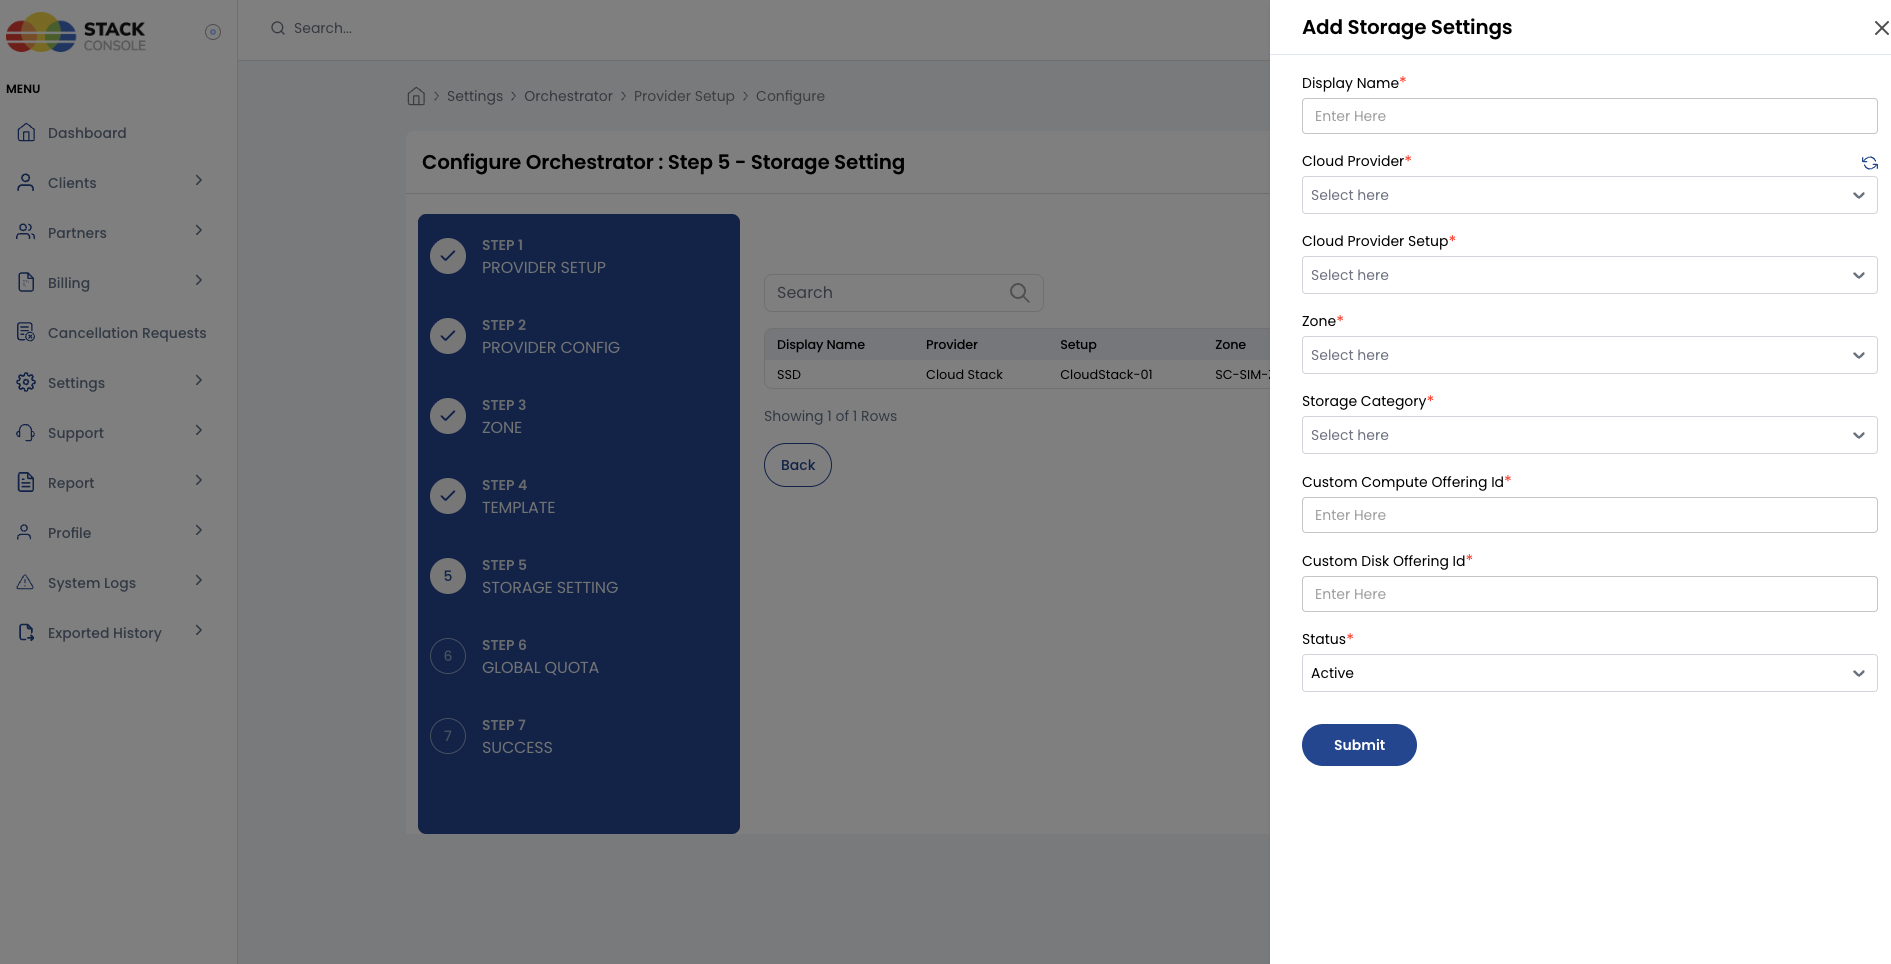
Storage configuration is covered on a dedicated page. Click the link below, then return here to continue the wizard.
Click Submit & Continue once storage settings are configured.
Wizard Step 6 — Global Quota
Set the default resource limits that apply to all customer accounts under this Cloud Provider setup.
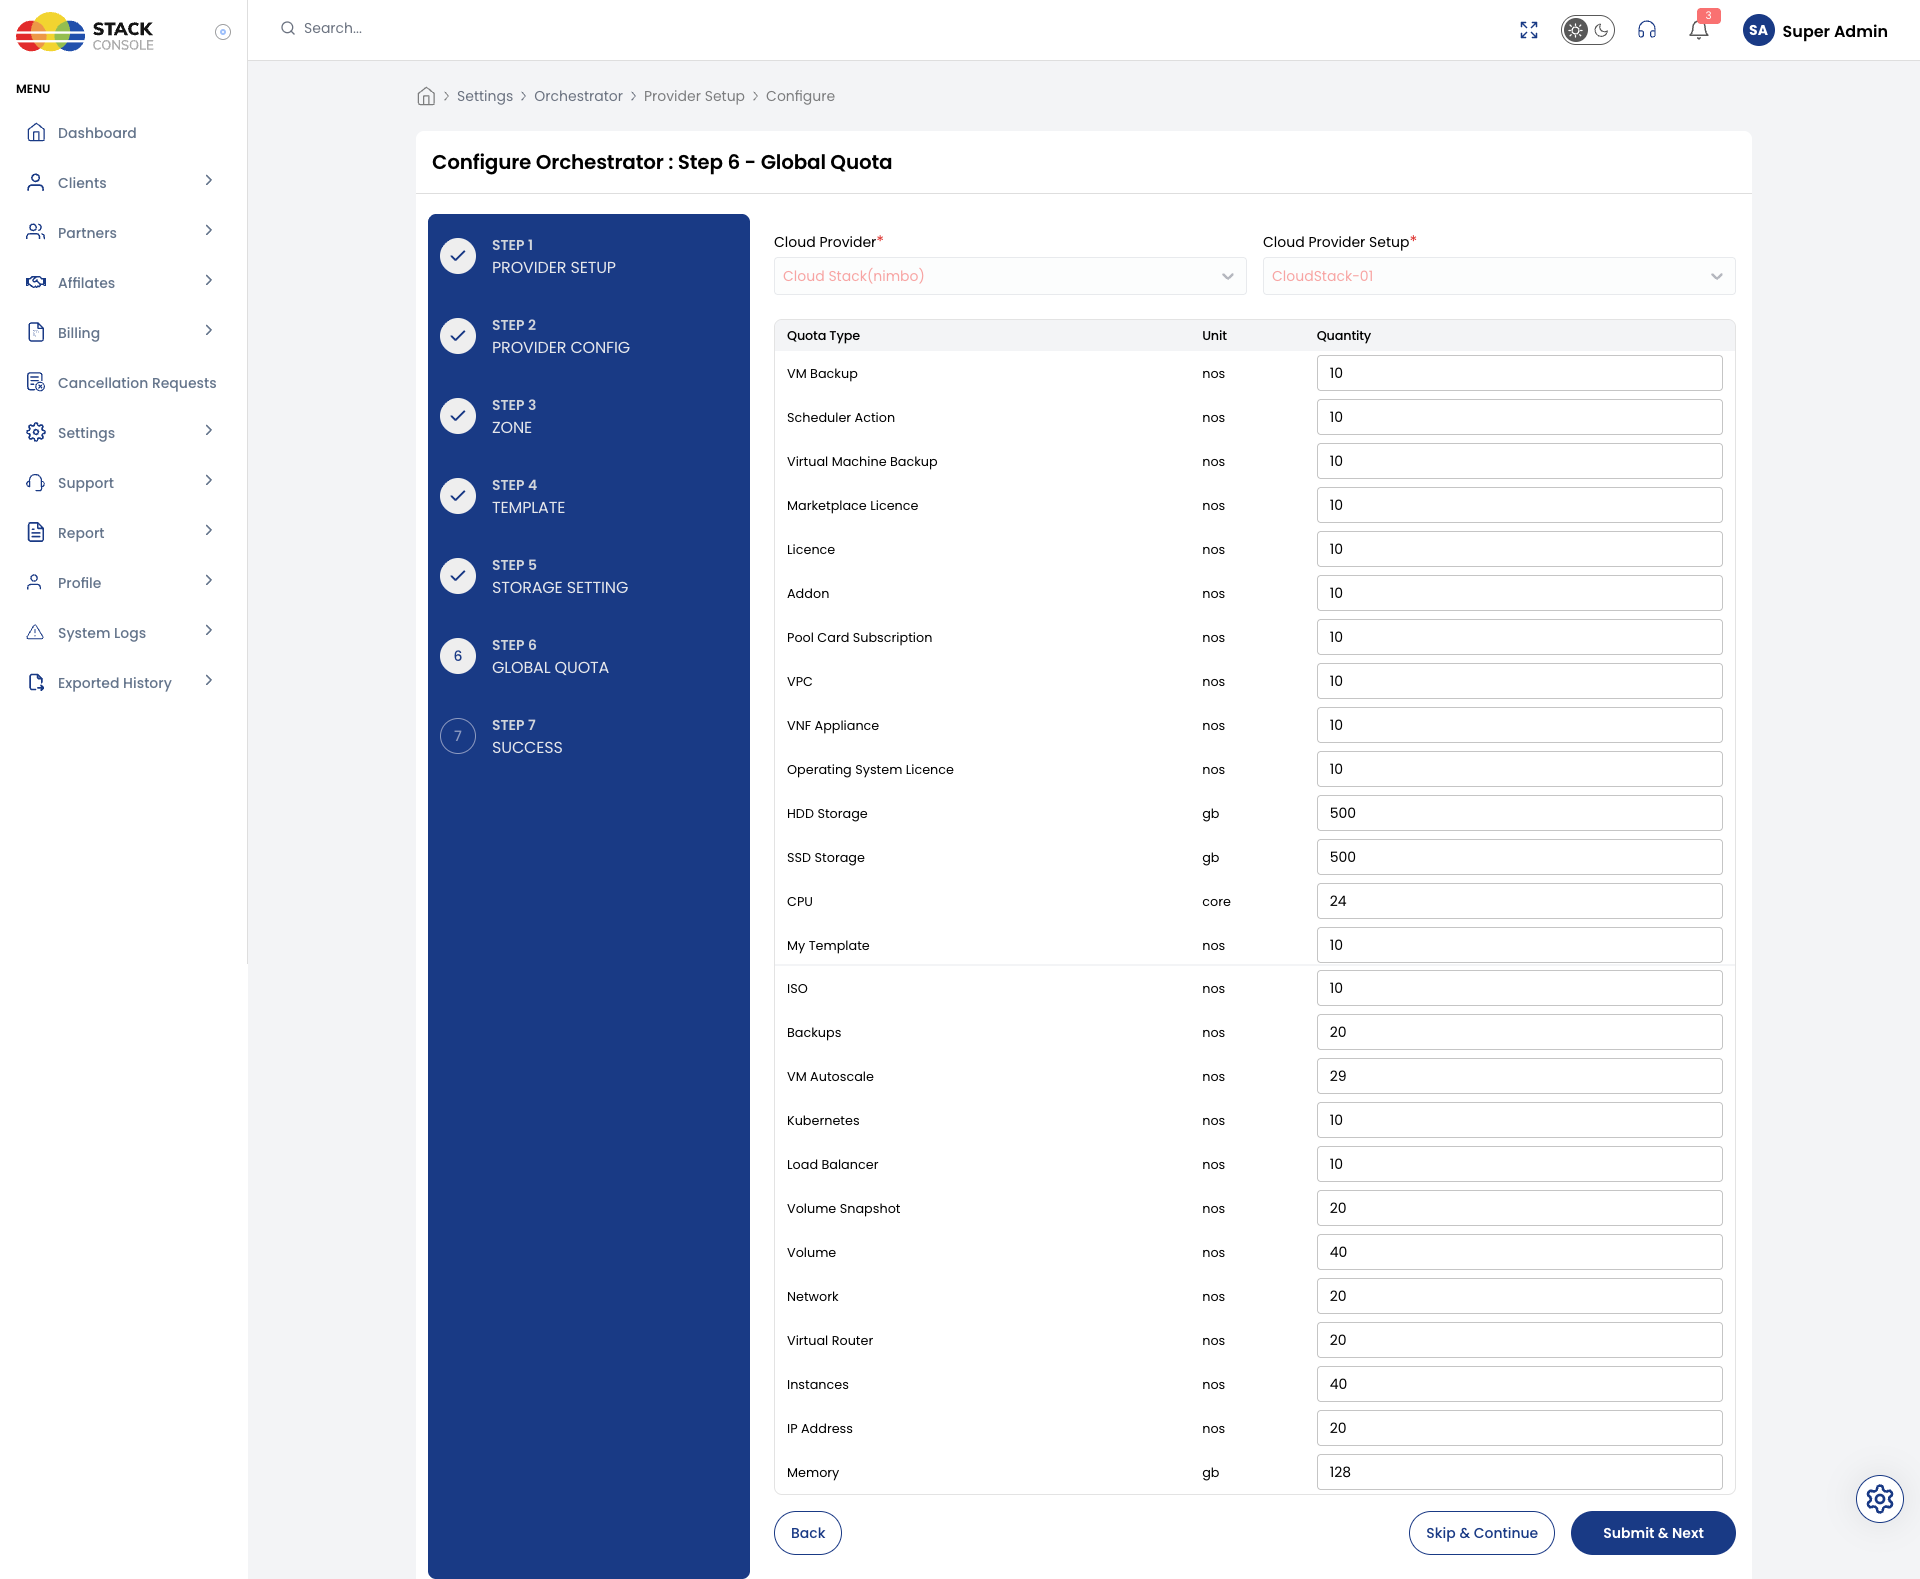
| Resource | Unit | Example Value |
|---|---|---|
| Instances | nos | 40 |
| CPU | core | 24 |
| Memory | GB | 128 |
| SSD Storage | GB | 500 |
| Block Storage | nos | 40 |
| Block Storage Snapshot | nos | 20 |
| Instances Snapshot | nos | 20 |
| Network | nos | 20 |
| Virtual Router | nos | 20 |
| Load Balancer | nos | 10 |
| IP Address | nos | 20 |
| Kubernetes | nos | 10 |
| VM Autoscale | nos | 26 |
| Backups | nos | 20 |
| ISO | nos | 10 |
| My Template | nos | 10 |
These are the global default quotas applied to all new accounts. You can override them per account or per project after setup. For full details on how CMP quota management works — including account-level overrides, project quotas, and quota increase requests — see the dedicated guide:
CMP quotas and CloudStack quota limits are separate systems. CloudStack
account and project limits default to low values. Set them to -1 (unlimited)
or to values higher than your CMP quotas to avoid provisioning failures.
In CloudStack Global Settings, search for max and update the limits.
See Quota Management (ACS).
Click Submit & Next to complete the wizard.
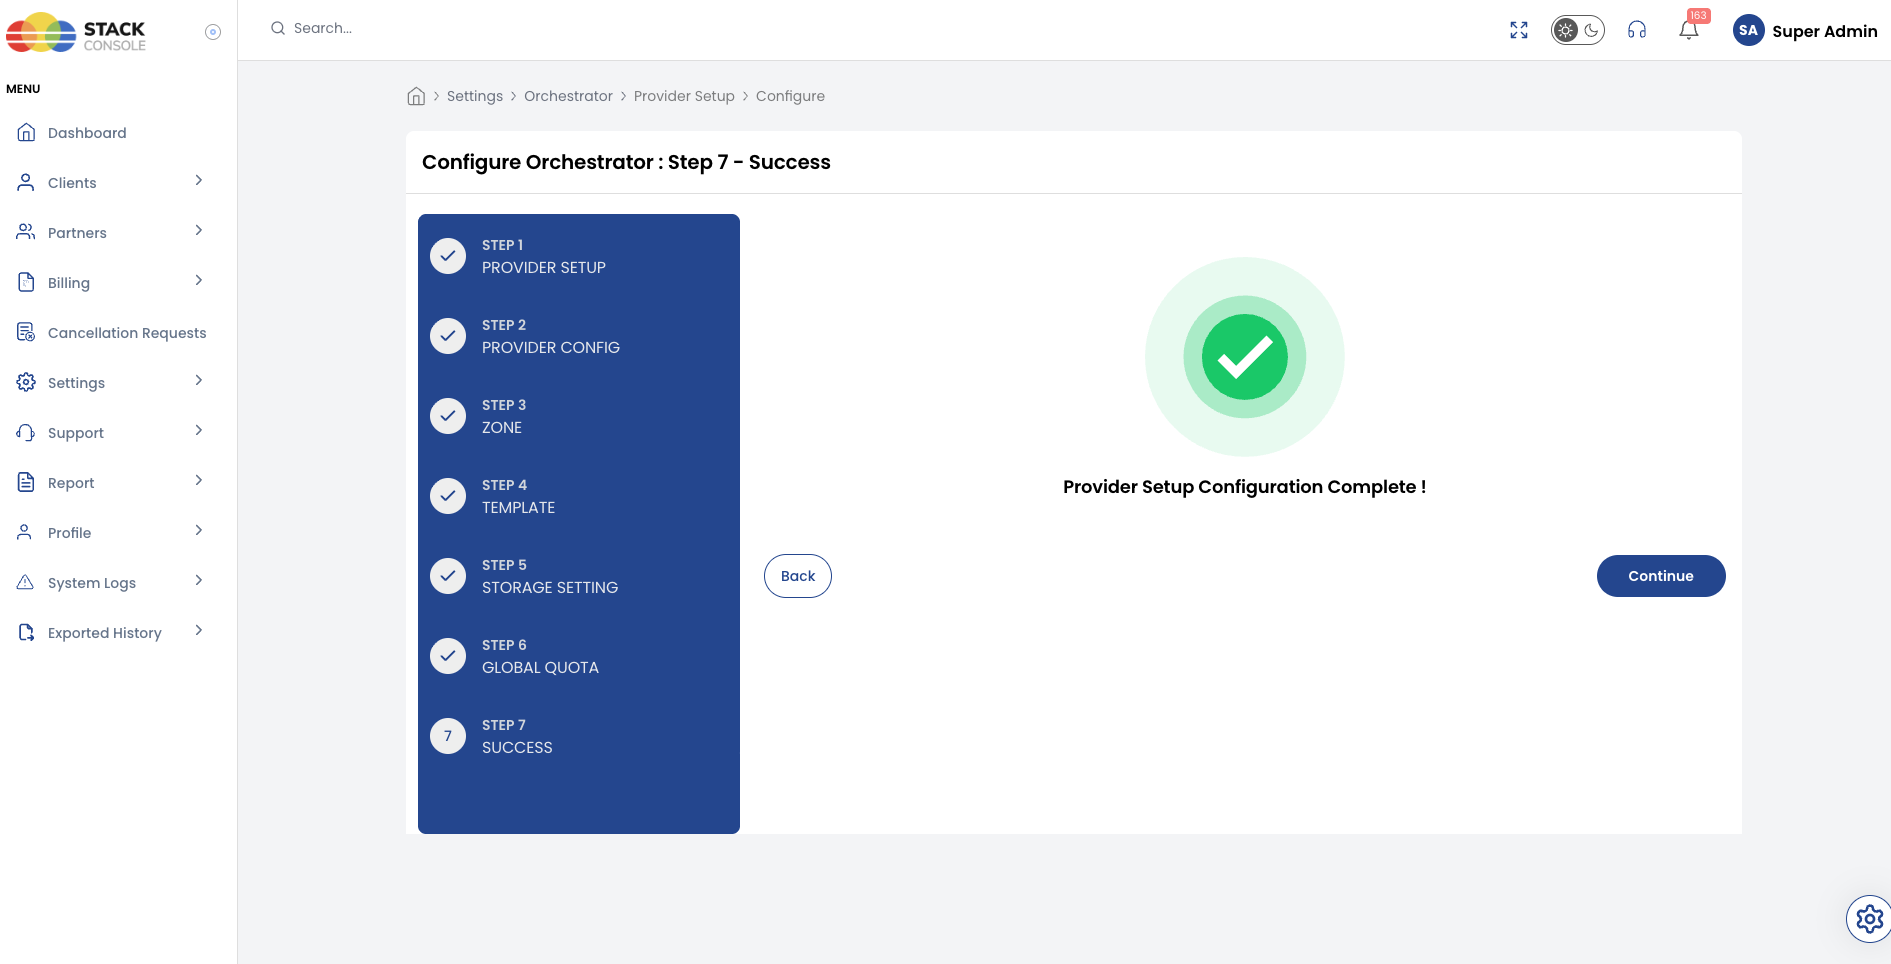
Wizard Step 7 — Success
The Cloud Provider setup is complete. CMP will display a success confirmation.
Questions and Answers
Why DomainAdmin and not ROOT?
A DomainAdmin role is sufficient for all current CMP operations. ROOT credentials are reserved for planned roadmap features. Using DomainAdmin follows the principle of least privilege.
Next steps
- Configuring Zones in CMP — map CloudStack zones and configure the Add Zone form
- Template Requirements — prepare OS templates for VM provisioning
- Storage Settings — map disk offerings to CMP storage categories
- Quota Management (ACS) — set CloudStack-level quota limits