AsiaPay
AsiaPay is a regional payment gateway used with CMP for customer payments (methods depend on your AsiaPay merchant configuration and CMP integration).
Provider: asiapay.com
| Configure in CMP | Settings → Billing Setup → Payment Provider, then Payment Setting |
| Sandbox | Use sandbox credentials until payments are verified |
| Payment modes | Typically prepaid top-up; confirm native autocharge with StackConsole before enabling postpaid |
What AsiaPay is used for in CMP
| Mode | Behaviour |
|---|---|
| Prepaid | Customer can select AsiaPay for wallet top-up when the gateway is active for the currency |
| Postpaid | Only if AsiaPay supports variable recurring card charges natively and Has Autocharge is enabled in CMP |
| Manual | No gateway auto-charge for offline settlement |
See Payment Gateways hub for branch and currency visibility rules.
Payment Gateway Providers
Form title: Edit Payment Gateway Providers
Path: Settings → Billing Setup → Payment Provider (breadcrumb: Payment Gateway Providers)
Configure AsiaPay at the Payment Provider level first (Currencies, Has Autocharge, logos, Status). Then complete Configure AsiaPay (Payment Gateway Settings) for credentials and branch assignment.
img/screenshots/cmp-payment-provider-asiapay.png

Currencies
Required. Select currencies this provider record supports (for example, USD, INR).
Has Autocharge
Yes / No. Enables postpaid auto-charge for AsiaPay in CMP when applicable.
Enabling Has Autocharge only turns the feature on at the application layer. AsiaPay must also support autocharge natively (variable recurring card charges). Confirm with the gateway vendor and StackConsole before using AsiaPay as a postpaid default. See Payment Gateways — postpaid requirement.
Upload Light Theme Logo / Upload Dark Theme Logo
Optional. Logos for light and dark themes.
Status
Required. Set Active when AsiaPay should be available as a payment provider.
Configure AsiaPay
- Confirm AsiaPay is configured under Payment Gateway Providers — see above
- Obtain AsiaPay sandbox (then live) merchant credentials
- Open Settings → Billing Setup → Payment Setting → Add or edit Asiapay
- Assign Branches, enter credentials, and set the flags below
- Assign AsiaPay to each currency under Currencies → Configure → Step 2 — see Payment Gateways
Add Payment Gateway Settings (AsiaPay)
Form title: Add Payment Gateway Settings (same fields when editing)
Path: Settings → Billing Setup → Payment Setting → add or edit Asiapay
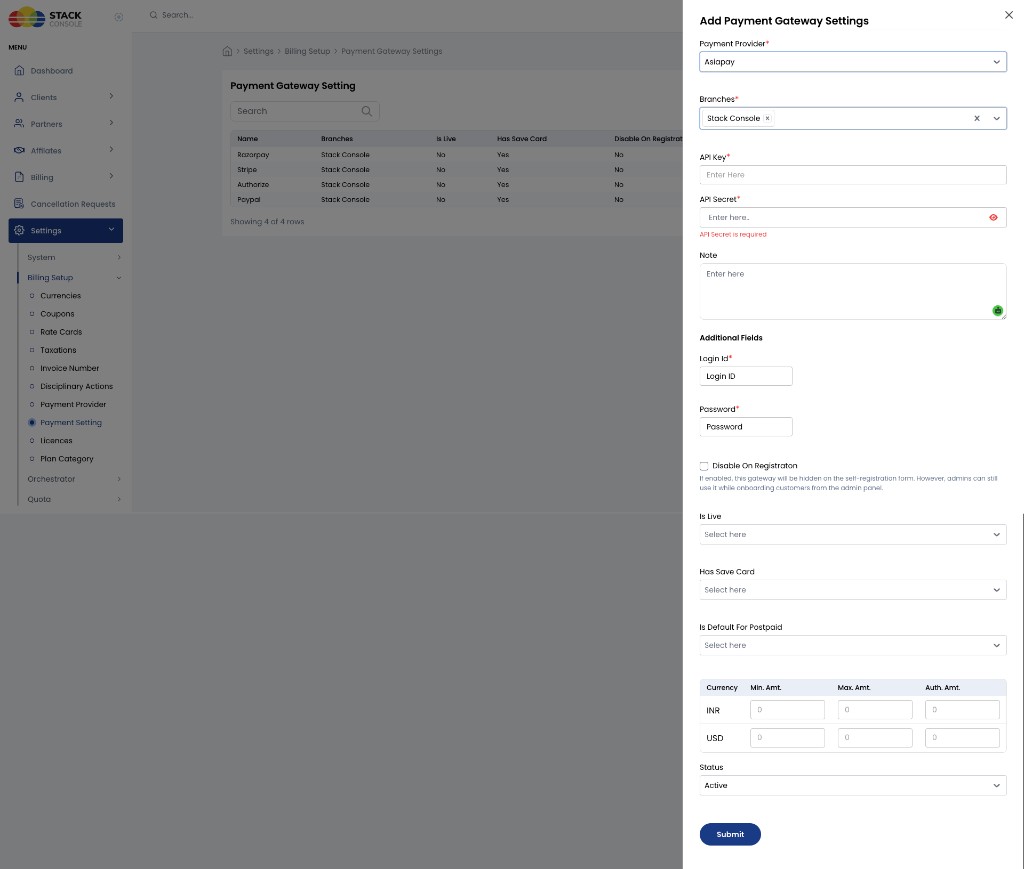
Payment Provider
Required. Select Asiapay.
Branches
Required. Assign AsiaPay to one or more branches (for example, Stack Console). The gateway is visible only for customers under those branches. See branch visibility.
API Key
Required. AsiaPay API key from your merchant account.
API Secret
Required. AsiaPay API secret — keep confidential. CMP shows a validation error if this field is empty.
Note
Optional. Internal description for this AsiaPay configuration.
Additional Fields
AsiaPay includes provider-specific fields under Additional Fields:
Login Id
Required. AsiaPay login ID (merchant login identifier).
Password
Required. AsiaPay password associated with the login ID — keep confidential.
Disable On Registration
Optional. If enabled, this gateway is hidden on the self-registration form. Admins can still use it while onboarding customers from the admin panel.
Is Live
Yes / No. Use No for sandbox / test credentials; set Yes only for production.
Has Save Card
Yes / No. Whether customers can save a card for later charges.
Is Default For Postpaid
Yes / No. Whether AsiaPay is the default gateway for postpaid / saved-card charging on that branch. Use only if AsiaPay supports postpaid autocharge natively.
Currency limits (on the AsiaPay gateway form)
| Column | Description |
|---|---|
| Currency | Currency code (for example, INR, USD) |
| Min. Amt. | Minimum transaction amount for this currency |
| Max. Amt. | Maximum transaction amount for this currency |
| Auth. Amt. | Authorization / hold amount used when validating a card |
Enter amounts per currency according to your AsiaPay merchant limits and business rules. Example rows on the form include INR and USD (default placeholders may show 0 until you set values).
These rows set min / max / auth amounts for AsiaPay. You must still attach AsiaPay to each currency under Currencies → Configure → Step 2 — see currency assignment.
Status
Active / Inactive. Set Active when this AsiaPay configuration should be available for the assigned branches (subject to currency assignment).
Testing
- Use sandbox credentials with Is Live = No before go-live
- Confirm Login Id and Password (Additional Fields) are correct
- Test prepaid top-up for an assigned branch and currency